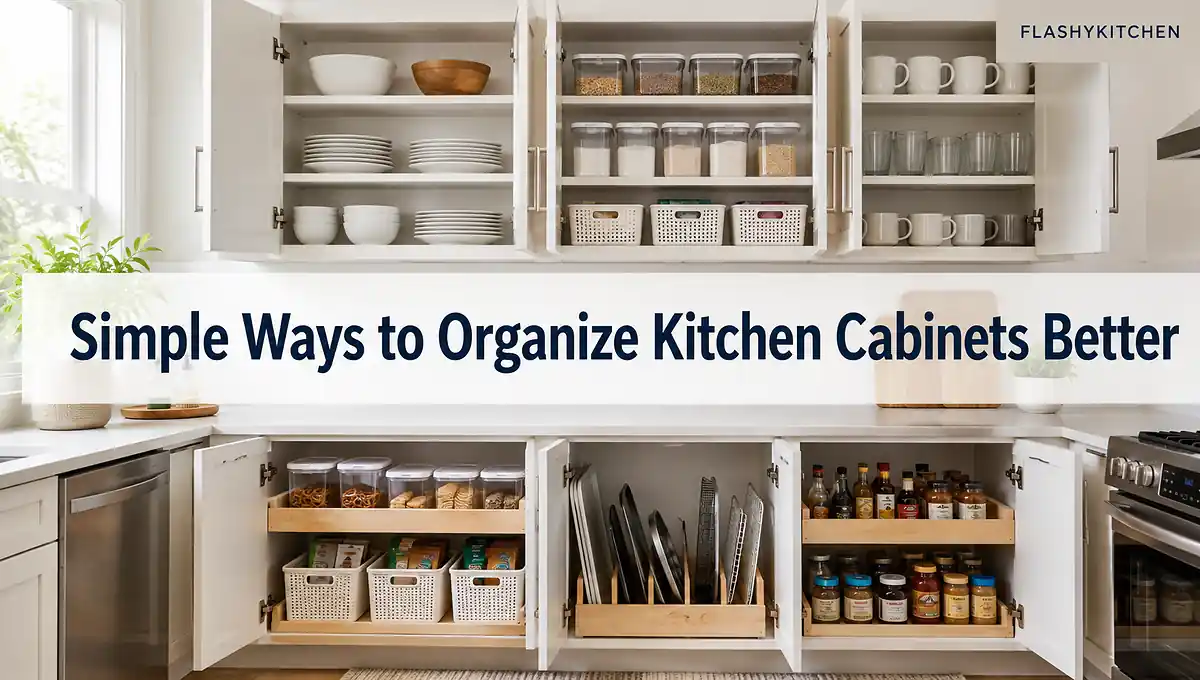
Most kitchen cabinet clutter isn’t caused by a lack of space. It’s caused by having no system for what goes where. A cabinet full of mismatched containers and rarely used gadgets will stay messy no matter how often you straighten it.
This guide walks through how to organize kitchen cabinets step by step, from measuring your actual shelves to choosing organizers that fit and setting up a routine you can maintain. You won’t need a professional or a big budget. You just need a tape measure, some time, and a clear method.
Quick Answer
This is how to organize kitchen cabinets so the system sticks. Empty and measure every cabinet first. Declutter what you don’t use, group what’s left, and assign each group to a zone based on where you use it. Choose organizers only after you know what you’re storing. Put heavy items low, and finish with a weekly reset.
- Empty and measure first.
- Toss expired or unused items.
- Map zones: prep, cooking, cleaning, storage.
- Buy organizers after you know what you’re storing.
- Do a 10-minute weekly reset.
Step 1: Empty, Clean, and Measure Your Cabinets
The first step in how to organize kitchen cabinets is to pull everything out. Every single item. This feels worse than it is, but it is the only way to see what you actually own. Sort items on the counter into rough piles: keep, donate, trash, and belongs elsewhere. If your shelves are sticky or dusty, wipe them down now. For a deeper clean, see our guide on how to clean kitchen cabinets.
While comparing manufacturer spec sheets, I noticed the listed door width almost never matches the interior opening. Measure the opening, not the door. Use a tape measure and record the interior width, depth, and height of each cabinet and drawer. You need those numbers before you buy any organizer.
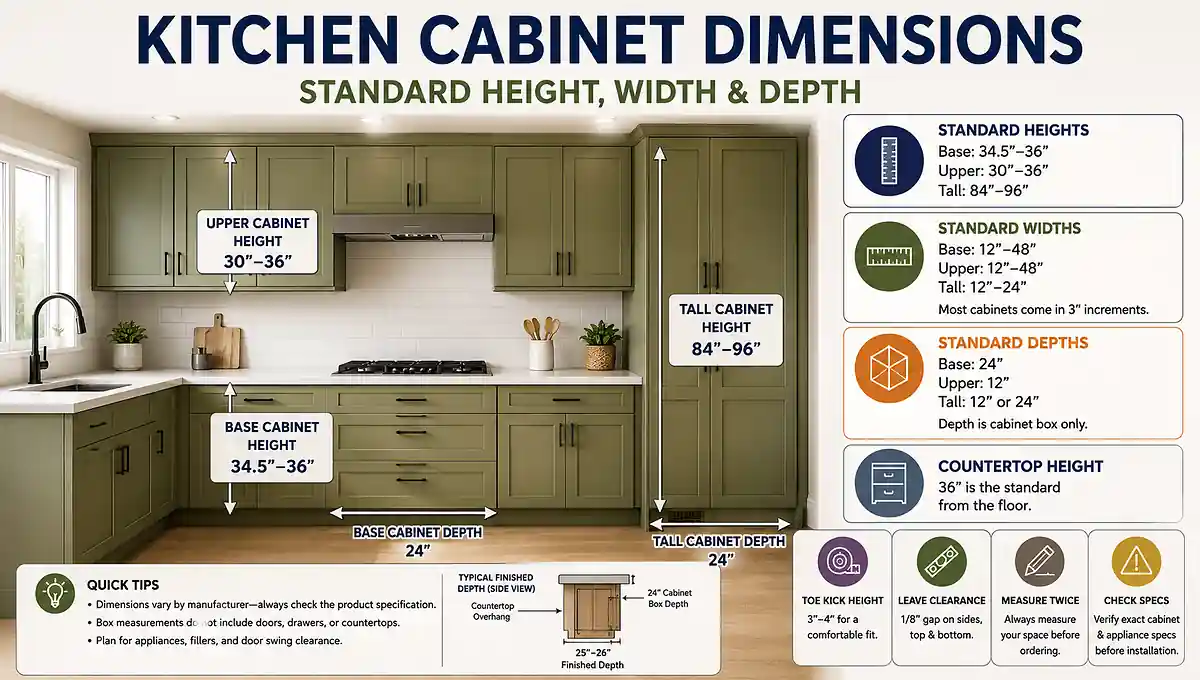
In most US kitchens, base cabinets are 24 inches deep and 34.5 inches high. Upper cabinets are 12 inches deep and usually 30 to 42 inches high. Wall cabinets above a fridge are often 24 inches deep but only 12 to 15 inches high. Drawers vary, but a common depth is 21 inches front to back. Older kitchens, custom builds, and apartments rarely match those numbers exactly, so measure your own openings.
| Cabinet type | Width (typical) | Depth | Height |
|---|---|---|---|
| Base cabinet | 9 to 48 inches | 24 inches | 34.5 inches |
| Upper cabinet | 9 to 48 inches | 12 inches | 30 to 42 inches |
| Pantry cabinet | 18 to 36 inches | 24 inches | 84 to 96 inches |
| Drawer (interior) | varies | 21 inches | 3 to 12 inches |
Measurements are for standard stock cabinets. Custom and semi-custom sizes differ.
Step 2: Declutter and Sort Everything Into Categories
Before you buy a single bin, get rid of what you don’t use. A cabinet full of expired spices and chipped mugs will still feel cluttered no matter how many organizers you add. Start with the obvious: expired food, duplicate utensils, containers without lids, lids without containers, and anything broken. Be honest about appliances. If you haven’t used the panini press in two years, it does not need prime cabinet space.
After decluttering, group what’s left by type. Put all glasses together, all plates, all pots, all pans, all food storage containers, all spices, all cleaning supplies, all baking sheets, and all small appliances. This is good kitchen cabinet organization before you touch a shelf.
A good rule: if you use it daily, it gets a spot at eye or hip level. Weekly items can go one shelf higher or lower. Monthly or seasonal items go to the top shelves, the back of deep cabinets, or another room. This frequency-of-use rule answers most “where does this go?” questions before they start.
Step 3: Map Your Kitchen Zones and Assign a Home
How to organize a kitchen starts with zones, not products. Where you put things in kitchen cabinets depends on how you use them, not where they happen to fit. Think about how you move when you cook. Most kitchens have four zones: prep, cooking, cleaning, and storage. The sink area is cleaning. The counter between sink and stove is prep. The stove is cooking. The pantry or fridge area is storage.
For example, knives, cutting boards, mixing bowls, and food prep tools belong near the prep counter. Pots, pans, cooking spoons, and oils belong near the stove. Glasses and mugs go near the sink or fridge. Plates and bowls go near the dishwasher or dining area. Spices go near the stove, but not directly above it because heat and steam ruin them.
The kitchen work triangle — sink, stove, fridge — is a useful starting point, but you don’t need to follow it perfectly. Real kitchens have points of friction. A cabinet door that hits you when you unload the dishwasher is a point of friction. Move those items. If opening a drawer while the oven is open blocks your path, move the utensil crock. Pay attention to what annoys you, then change it.
Also consider who else uses the kitchen. If kids help set the table, keep their plates and cups in a low drawer they can reach. If two people cook, keep oils and spices in a central spot. If cabinets are dark, under-cabinet lighting makes it easier to see what’s inside.
Step 4: Choose Organizers That Actually Fit
Good kitchen cabinet storage starts with the right measurements. Only buy organizers after you have decluttered and mapped zones. Most people do this backwards: they buy pretty bins first, then try to make them work. That leads to returns and wasted money. Retailer listings often quote the overall organizer footprint, not the clearance needed above it, so check height and depth against your recorded numbers.
| Organizer | Best for | Cost range | What to measure first |
|---|---|---|---|
| Shelf riser | Stacking mugs, plates, canned goods | $8 to $25 each | Shelf width and vertical clearance |
| Lazy Susan | Corner cabinets, spices, oils | $10 to $35 | Cabinet depth and diameter clearance |
| Drawer dividers | Utensils, junk drawer, flatware | $5 to $20 set | Drawer interior width and depth |
| Clear bins | Food packets, snacks, under-sink | $6 to $15 each | Shelf depth and height |
| Peg system | Plates, bowls, baking sheets | $10 to $30 | Drawer or cabinet width |
Prices as of August 2026 and vary by region and retailer. Measure interior dimensions, not door opening.
Shelf risers work when you have tall space wasted above short items. But they fail in food cabinets because they hide what’s behind. A better use is stacking mugs or plates. Lazy Susans are perfect for blind corner cabinets, but they waste space if the cabinet is shallow. Drawer dividers keep utensils from sliding, but they only work if the drawer is deep enough. Clear bins help you see what’s inside; opaque bins are where things go to die. Peg systems keep plates from shifting but require drilling or adjustable pegs.
If you’re on a tight budget, skip most of these. You can get extra shelves cut at a hardware store for a few dollars each. Tension rods hold cutting boards and baking sheets upright. Small cardboard boxes covered in contact paper work as drawer dividers. For more product roundups, see our kitchen cabinet storage ideas.
Step 5: Put Everything Back by Zone
How to arrange things in kitchen cabinets gets easier once zones are clear. How to arrange your kitchen cupboards is the last part of how to organize kitchen cabinets. Start with the zones you use most.
Upper Cabinets: Glasses, Mugs, and Plates
Store lightweight items you grab often. Glasses, mugs, plates, bowls, and everyday food containers go here. Keep heavy items out of uppers. A full stack of plates is heavy enough; a cast iron pot is too heavy. If you need a step stool to reach a shelf, store only occasional items there.
Lower Cabinets and Deep Drawers: Pots and Pans
Pots and pans go in the lowest drawer or cabinet near the stove. Put lids with their pots, or use a lid organizer on the door. Baking sheets, cooling racks, and cutting boards store vertically in a deep cabinet or drawer. Use a tension rod or a pan organizer to keep them upright. Small appliances you use weekly can go in a lower cabinet; daily appliances stay on the counter.
Food Storage Containers and Tupperware
This is the avalanche zone. The fix is simple: store lids with bottoms, not separately. If space is tight, stack bottoms and file lids vertically in a drawer divider. Better yet, keep only containers that nest and have matching lids. For a full pantry method, see how to organize a kitchen pantry.
Spices, Under-Sink, and the Junk Drawer
How to organize kitchen drawers often starts with spices. Keep them near the stove but not above it. A drawer with angled dividers works if you have the space. Otherwise, a lazy Susan in a cabinet next to the stove works. Do not decant every spice into matching jars unless you enjoy extra work.
Under the sink, limit it to cleaning supplies, dishwasher tabs, trash bags, and a pair of gloves. Use an expandable shelf that fits around the pipe. Do not store backups of every cleaner under the sink; keep extras in a utility closet.
The junk drawer is not a failure if it is contained. Use a small drawer divider. Limit it to scissors, pens, tape, a measuring tape, and a utility knife. If it doesn’t fit, it belongs elsewhere.
Kids’ Drawer
If you have kids, create a low drawer with their plates, cups, and utensils. They can set the table and unload the dishwasher themselves. This keeps them out of the hot cooking zone and gives them independence.
If you need extra storage for overflow, a freestanding kitchen pantry storage cabinet can hold less-used items.
Step 6: Small Kitchen and Corner Cabinet Adjustments
Small kitchens need different rules. Every item must earn its space. These kitchen cabinet organization ideas work for awkward spaces. Use vertical space: stackable shelves, door racks, and upper shelves hold more than you think. If you can, add small kitchen remodel ideas like a pull-out pantry.
Corner cabinets are awkward. A lazy Susan is the classic fix, but only if the cabinet is deep enough. For blind corners, a pull-out swing shelf works but costs more. If you can’t add hardware, store large, rarely used items there — roasters, holiday platters, big stock pots. Small items get lost in corners.
Deep lower cabinets without drawers are where things go to die. Use stackable bins with handles. Label the front. Pull the whole bin out to reach the back. Or install roll-out drawers if your budget allows. If you rent, skip permanent changes and use freestanding bins or over-the-door hangers instead.
Step 7: Maintain the System
These kitchen cabinet organization tips only work if you maintain the system. Organizing kitchen cabinets is not a one-time project. Set a 10-minute weekly reset. Return items to their zones, toss anything that wandered in, and wipe down one shelf. Do a quarterly deep check: pull everything out, re-declutter, and adjust zones if something isn’t working.
Involve the family. Show everyone where things belong. Label shelves and drawers if that helps. The goal is that anyone can find the forks without asking and put them back correctly.
Common Mistakes to Avoid
The best way to organize kitchen cabinets is to avoid these errors.
- Buying organizers before decluttering. This wastes money and space.
- Storing heavy items high. A cast iron pot above your head is dangerous.
- Putting spices above the stove. Heat and steam ruin them.
- Keeping too many mugs, Tupperware, or water bottles. You only need a few.
- Ignoring points of friction. If a cabinet door hits you, move the items.
- Decanting everything into matching containers. It looks nice but adds work.
- Forgetting to measure. Organizers that don’t fit end up in the junk drawer.
FAQ
How do I organize kitchen cabinets without buying organizers?
Use what you have. Cut extra shelves at a hardware store to fit your cabinets. Use small cardboard boxes or shoeboxes wrapped in paper as drawer dividers. Tension rods hold baking sheets and lids upright. The best organizer is often a decluttered cabinet with fewer items.
How do I organize Tupperware lids so they don’t fall?
Store lids with their containers whenever possible. If space is tight, stack containers and file lids vertically in a drawer divider or a small bin. Sort by shape, not size. Toss any lid without a match.
What is the kitchen work triangle and do I need to follow it?
The kitchen work triangle connects the sink, stove, and fridge. It makes cooking efficient by shortening the path between those three. You don’t need to follow it exactly, but use the idea: put items near where you use them. If a triangle doesn’t fit your layout, just minimize points of friction.
How often should I reorganize my kitchen cabinets?
Do a light reset every week — 10 minutes to put things back. Do a full re-declutter and zone check every three to six months. If a cabinet becomes a mess again, fix the zone instead of forcing the same system.
Conclusion
You now have a complete method for how to organize kitchen cabinets without a professional or a big budget. Empty, measure, declutter, map zones, choose only the organizers you truly need, and maintain the system with a weekly reset. Start with one cabinet today. Once you see the difference, you will want to finish the whole kitchen, and the method above will carry you through.
One thought on “How to Organize Kitchen Cabinets: A Step-by-Step Guide”