If you are searching for how to deep clean kitchen surfaces, the difficult part is usually not the cleaning itself. It is knowing where to start, what order saves time, and which products will remove grease without damaging cabinets, countertops, appliances, or floors. A proper deep clean goes beyond wiping visible crumbs.
It reaches cabinet tops, appliance edges, sink seams, drawers, filters, furniture, and hidden grease. This guide gives you a practical top-to-bottom system, material-specific precautions, realistic timing, common mistakes, and a maintenance plan that makes future cleaning easier.
Quick Answer
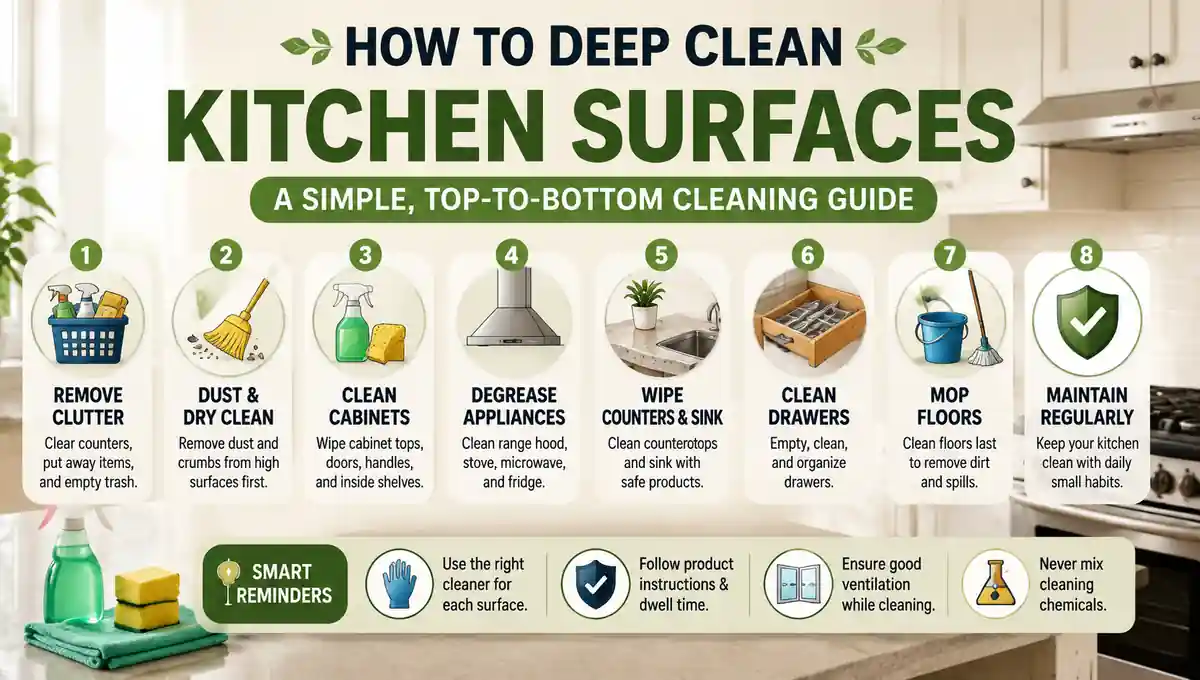
To deep clean a kitchen, remove clutter first, then clean from high surfaces down to the floor. Remove dry dust and crumbs before using liquid cleaners. Clean cabinet tops, appliances, cabinet fronts, countertops, sinks, furniture, and floors in that order.
Match every cleaner to the surface material and allow approved products their label-specified dwell time before wiping. Avoid aggressive scrubbing, excessive water, and mixed cleaning chemicals. The goal is not simply to make the kitchen look cleaner, but to remove hidden buildup without damaging finishes or creating extra work.
Where Should I Start Before Deep Cleaning My Kitchen?
Start by making the kitchen easier to clean rather than immediately spraying the dirtiest surface. Put away dishes, clear countertops, empty the trash, and gather microfiber cloths, a vacuum or broom, a mop, mild dish soap, and only the cleaners your surfaces require.
Empty one cabinet, drawer, or pantry section at a time if storage is crowded. Remove crumbs, check food dates, wipe spills, and group similar items before restocking. A practical pantry organization system can make it easier to keep shelves accessible after the deep clean.
Do not combine several homemade and commercial cleaners during the same job. Keep products in labeled containers, follow their directions, provide ventilation when required, and patch-test unfamiliar cleaners in an inconspicuous area.
What Is the Best Order for Deep Cleaning a Kitchen?
The most efficient cleaning order is high to low and dry to wet. Dust, crumbs, and loosened grease fall while you work, so cleaning the floor too early usually means cleaning it again.
Start High and Work Down
Begin with safely reachable light fixtures, cabinet tops, vents, and the top of the refrigerator. Remove dry dust before adding liquid cleaner.
Continue through upper cabinets, the range hood, refrigerator, microwave, other appliances, lower cabinets, countertops, the sink, furniture, and finally the floor.
Let suitable cleaners do part of the work. Dwell time is the period a product remains on a surface before it is wiped away. Follow the time printed on the product label rather than leaving chemicals on longer or creating a stronger mixture.
Be Careful Before Moving Appliances
Do not automatically pull out a refrigerator, range, or dishwasher simply because you want to clean behind it. Check the appliance manual and inspect the surrounding area first.
Heavy appliances may involve electrical cords, water lines, gas connections, anti-tip brackets, or delicate flooring. If moving an appliance requires disconnecting something you are not qualified to handle, clean the safely accessible areas and leave the connection work to an appropriate professional.
How Do I Clean Greasy Cabinets Without Damaging Them?
Greasy cabinets usually need patience more than aggressive chemicals. Remove dry dust first, then use a soft microfiber cloth and a cleaner compatible with the finish.
Painted wood, sealed wood, laminate, thermofoil, MDF, and other cabinet surfaces can respond differently to moisture and chemicals. If you are unsure what your cabinets are made from, identify the kitchen cabinet materials before applying a strong degreaser.
Focus on handles, door edges, grooves, and areas above or beside the stove where airborne grease collects. Work in small sections so moisture does not sit along seams or unfinished edges.
Allow an approved grease cleaner its recommended dwell time, then wipe gently instead of grinding the finish with an abrasive pad.
For cabinet interiors, remove food and shelf liners, vacuum crumbs, wipe shelves lightly, and dry them before restocking. Use the empty-cabinet stage to improve cabinet storage ideas rather than returning clutter to the same difficult-to-clean arrangement.
If a dark or sticky-looking mark remains after two gentle cleaning attempts, stop escalating. It may be damaged finish, staining, or embedded discoloration rather than dirt that a stronger chemical can safely remove.
How Do I Clean Counters, Sinks, and Appliances?
Clean countertops after the messier cabinet and appliance work so crumbs and dust do not land on surfaces you already finished. The safest method depends on the material.
| Surface | Safer Starting Method | Avoid or Check First |
|---|---|---|
| Painted or sealed cabinets | Damp microfiber and mild approved cleaner | Soaking seams and abrasive pads |
| Natural stone | pH-neutral stone-safe cleaner | Vinegar and acidic products |
| Quartz or laminate | Mild soap and soft cloth | Strong abrasives |
| Stainless steel | Mild detergent and microfiber cloth | Steel wool and harsh chemicals |
Natural stone deserves extra caution. Acidic cleaners can affect some stones or their sealers, especially marble, limestone, and travertine.
For the sink, remove food debris first, then clean the basin and faucet. A stainless steel sink generally needs a mild detergent and non-scratch cloth rather than aggressive abrasion.
Persistent drain odor may come from trapped food, buildup, or a plumbing issue. Do not pour several different chemicals into the drain hoping one will solve the problem.
Clean refrigerator shelves and drawers after removing food. Wipe door seals, handles, and reachable interior surfaces, then dry them before replacing food.
For ovens, stovetops, range hoods, and dishwasher filters, follow manufacturer instructions. Do not assume every removable part can soak in the same cleaner.
Unplug suitable countertop equipment before cleaning near electrical components. When everything is dry, return only the small kitchen appliances you regularly use so more counter space remains easy to wipe.
How Should I Clean Kitchen Furniture?
Kitchen furniture collects dust, crumbs, splashes, and cooking residue too. Clean it according to the material rather than using countertop cleaner on every table, chair, or bench.
Start by vacuuming crumbs from chair seams, bench joints, and upholstered surfaces. Wipe hard furniture using a material-safe cleaner and avoid leaving excess water on wood joints or damaged finishes.
Move only lightweight furniture that can be handled safely. A practical kitchen furniture guide can also help you understand how different furniture arrangements affect access to corners, walls, and floor areas.
Clean underneath chairs, benches, tables, and freestanding storage before returning them to position.
How Do I Deep Clean Kitchen Floors Without Leaving Them Sticky?
Kitchen floors belong near the end because everything above them sheds dust, crumbs, and cleaner droplets.
Sweep or vacuum thoroughly before mopping. Removing dry debris first prevents dirt from turning into muddy residue when water is added.
Use the smallest effective amount of cleaning solution. Too much detergent can leave a film that feels sticky after drying, and adding even more product usually makes the problem worse.
Tile, sealed wood, vinyl, and linoleum require different care. Follow the flooring manufacturer’s instructions instead of assuming one cleaner is suitable for every surface.
Pay attention to baseboards, corners, floor edges, spaces under movable chairs, and the strips directly in front of the stove and sink.
If the floor still feels sticky after drying, residue may remain. A second pass using the floor manufacturer’s recommended method may be more effective than adding more detergent.
Do I Need to Disinfect the Kitchen After Cleaning?
Not every kitchen deep clean requires disinfecting every surface. Routine cleaning removes dirt, grease, food residue, and many germs from ordinary household surfaces.
Cleaning and disinfecting are different tasks. Cleaning physically removes soil and debris, while disinfecting uses a product designed to kill specified microorganisms when applied correctly.
If disinfection is appropriate, clean the surface first. Dirt and grease can reduce how effectively a disinfectant reaches the surface.
Follow the product’s required contact time. This usually means keeping the surface visibly wet for the period stated on the label.
Never mix household bleach, disinfectants, or other cleaners together. Chemical combinations can create dangerous fumes and may damage surfaces.
Food-contact surfaces may also require rinsing after certain products, so always follow label directions.
How Long Does It Take to Deep Clean a Kitchen?
There is no universal cleaning time because kitchen size, grease buildup, cabinet contents, appliances, furniture, and clutter all affect the workload.
A regularly maintained small kitchen may be completed in one focused session. A kitchen with heavy grease, packed cabinets, and neglected appliance areas may take considerably longer.
Instead of treating somebody else’s cleaning time as a deadline, divide the job into logical zones.
You might clean storage and high surfaces first, cabinets and appliances next, then counters, sinks, furniture, and floors.
This approach also reduces rushed decisions. Cleaning too quickly can lead to excessive chemical use, scratched surfaces, skipped areas, or unsafe appliance moving.
How Often Should I Deep Clean My Kitchen?
Deep cleaning frequency should depend on actual buildup rather than a rigid calendar.
A kitchen used for frequent frying, heavy cooking, or daily family meals will usually collect grease faster than one used for lighter cooking.
Watch for practical signs that another deep clean is needed:
- Sticky cabinet surfaces
- Grease around the range hood
- Crumbs inside drawers
- Dust on cabinet tops
- Residue around appliance edges
- Food spills inside the refrigerator
- Sticky floor buildup
- Persistent clutter hiding surfaces
Weekly maintenance can delay these problems. Wipe fresh splashes, remove crumbs, clean food spills quickly, and keep frequently touched surfaces under control.
The easier routine cleaning becomes, the less demanding the next deep clean will be.
Common Kitchen Deep Cleaning Mistakes to Avoid
The most damaging mistake is assuming stronger cleaning always means better cleaning. Surface damage often starts when people keep increasing chemical strength or scrubbing pressure after ordinary dirt has already been removed.
Avoid these common mistakes:
- Using one cleaner on every material
- Mixing cleaning chemicals
- Cleaning floors before upper surfaces
- Wet-cleaning before removing dry debris
- Using abrasive pads on delicate finishes
- Soaking cabinet seams
- Moving heavy appliances without checking connections
- Using excessive detergent
- Ignoring cleaner contact times
- Treating permanent damage as removable dirt
- Restocking shelves before they dry
- Forgetting hidden grease zones
A deep clean also has limitations. Cleaning cannot repair peeling finishes, swollen MDF, etched stone, damaged wallpaper, burned surfaces, or plumbing problems.
Recognizing the difference between dirt and damage helps prevent an inexpensive cleaning job from becoming an expensive repair.
Make Your Next Kitchen Deep Clean Easier
A successful deep clean should leave the kitchen easier to maintain, not simply cleaner for one day. Follow the same high-to-low order each time, remove dry debris before wet cleaning, and use the mildest cleaner suitable for each surface.
Pay extra attention to cabinet edges, appliance seals, hidden crumbs, grease zones, furniture, and floor edges. If you remember one rule for how to deep clean kitchen surfaces, make it simple: match the method to the material and stop before cleaning turns into damage.