
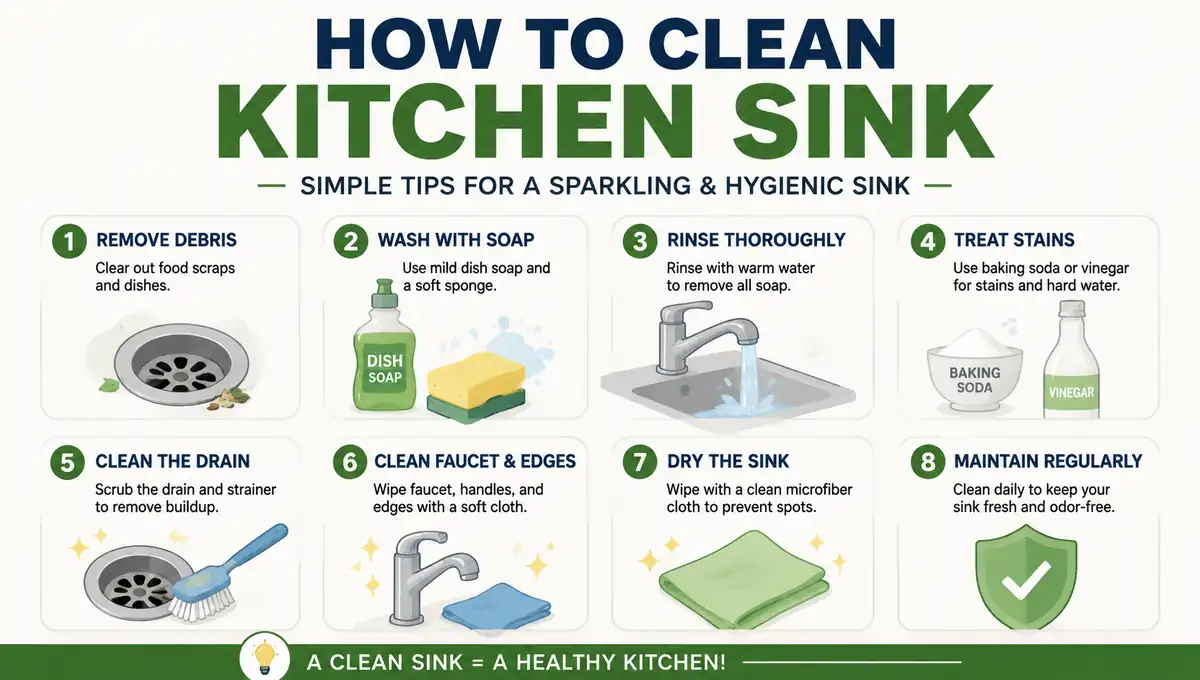
If you want to know how to clean kitchen sink surfaces without scratching, staining, or dulling them, start by identifying the sink material and the problem.
Food film, hard-water spots, grease, drain odor, and slow drainage need different fixes. Stainless steel, porcelain, enamel, and composite sinks also react differently to acids, abrasives, and bleach.
The safest routine is simple: remove debris, wash with mild dish soap, rinse, dry, then treat any remaining stain or odor separately. By the end, you will know what to use, what to avoid, how to clean the drain and faucet, and when cleaning should stop.
Quick Answer
To clean a kitchen sink, remove dishes and food scraps, rinse the basin, wash it with mild dish soap and a soft sponge, rinse again, then dry with microfiber.
Treat stains only after basic cleaning fails, and check the sink maker’s care instructions before using acids, bleach, or abrasives. Clean the drain, faucet, aerator, grate, and garbage disposal separately because each traps different buildup.
If odor or slow drainage returns after cleaning, inspect the disposal, P-trap, or drain line instead of adding stronger chemicals.
How to Clean Kitchen Sink for Daily Cleaning
For routine or deep cleaning, begin with the mildest method that can remove ordinary food film and grease. That protects the finish and makes it easier to see which marks actually need extra treatment.
- Remove dishes, racks, strainers, and loose food from the basin.
- Rinse with warm water to loosen fresh residue and grease.
- Add a small amount of mild dish soap to a damp sponge or microfiber cloth.
- Wipe the basin, rim, corners, drain opening, and faucet base.
- Use a soft brush around seams, textured areas, and the strainer.
- Rinse away all soap so dried residue does not leave a film.
- Dry the sink with a clean microfiber cloth to reduce water spots.
For daily cleaning, that is usually enough. A deep clean should focus only on what remains after this basic wash, such as mineral deposits, staining, drain slime, or buildup around fixtures.
Do not disinfect a visibly dirty sink first. Cleaning removes food residue and grease, while a disinfectant works best on a surface that has already been cleaned and is used according to its label.
Never mix bleach, disinfectant, vinegar, ammonia, or drain-opening products. Stronger chemistry does not mean a cleaner sink, and some combinations can release dangerous fumes.
Keeping the splash zone clear also reduces work. Simple countertop decor ideas can help keep bottles and decorative items away from areas that need frequent wiping.
Routine DIY cleaning often uses supplies you already own. Specialty cleaners or plumbing service cost more, so start with material-safe basics before buying another product.
Match the Cleaner to Your Sink Material
The best cleaner depends on the sink material, not on how dirty the basin looks. Across manufacturer care instructions, mild soap and a soft cloth are the safest starting point, while guidance differs most on acids, chlorine products, and abrasive powders.
| Sink material | Safer starting method | Main risk |
|---|---|---|
| Stainless steel | Mild dish soap, soft cloth, rinse, dry | Scratches and streaks |
| Porcelain or enamel | Mild soap and non-scratch sponge | Chipping and surface wear |
| Black composite | Mild soap, soft sponge, dry after rinsing | Mineral haze and harsh chemicals |
| Specialty surface | Manufacturer-approved care | Finish-specific damage |
How to Clean a Stainless Steel Kitchen Sink
To clean a stainless steel kitchen sink, wash with mild dish soap, then rinse and dry the basin. If the steel has a visible grain, wipe in that direction because cross-grain scrubbing can make scratches and streaks easier to notice.
For stubborn film, a small amount of baking soda can act as a mild abrasive on many stainless sinks. Use light pressure and stop if the finish begins to look scratched or uneven.
Avoid steel wool and harsh scouring pads. They can scratch the surface and may leave tiny metal particles that later create rust-colored marks.
Water spots often look worse than the underlying dirt. Drying the basin after rinsing may restore the appearance without any stronger cleaner.
How to Clean a Black Composite Kitchen Sink
A black composite sink often shows pale haze from mineral deposits rather than permanent staining. Wash it with mild dish soap, rinse well, and dry the surface before deciding that a stronger cleaner is needed.
Composite formulas vary, especially in how they react to acids, bleach, descalers, and abrasive powders. If you cannot identify the material, use the mild method first and check the maker’s instructions before treating mineral deposits.
How to Clean a White or Porcelain Kitchen Sink
To clean a white kitchen sink or porcelain basin, start with mild soap and a non-scratch sponge. Rinse away loose grit first so particles do not act like sandpaper while you scrub.
Coffee, tea, and metal-transfer marks may need more than dish soap, but use only treatments the sink manufacturer allows. If a mark survives gentle cleaning, inspect it closely: a stain may improve, while a chip, worn glaze, or scratch will not.
How to Clean a Kitchen Sink Drain and Stop Smells
To clean a kitchen sink drain, start with the parts you can actually see and remove. Drain odor commonly comes from food film on the strainer, stopper, garbage-disposal splash guard, or buildup inside the drain rather than from the basin itself.
Remove visible scraps and wash the strainer or stopper, including the underside. If the smell returns quickly, grease, food residue, disposal buildup, or debris farther down the pipe may still be present.
Baking Soda and Vinegar: Useful, but Not a Universal Fix
Baking soda can help absorb odor and loosen light residue, while vinegar may help with some mineral or organic buildup where the plumbing and sink material allow it. The fizzing reaction does not prove that a physical clog has been removed.
If you want to clean the kitchen sink drain naturally, use baking soda and vinegar only for light maintenance. Never combine them with bleach, ammonia, commercial drain opener, or another cleaner. A drain that repeatedly backs up needs debris removal, disposal cleaning, or P-trap inspection instead.
How to Clean a Kitchen Sink Drain With a Garbage Disposal
If your sink has a garbage disposal, switch it off before cleaning accessible parts and never place your hand inside the grinding chamber. The rubber splash guard deserves special attention because grease and food film can hide on its underside.
Clean the splash guard with a brush or cloth while the unit is safely off, then follow the disposal maker’s instructions. If it hums, jams, leaks, or still drains poorly, stop cleaning; a mechanical fault is not a hygiene problem.
How Do You Clean the Sink Grid and Faucet Parts?
Clean the faucet exterior with mild soap and a soft cloth, then dry it to reduce spots. Mineral buildup on the faucet head or aerator can reduce flow and make spray patterns uneven.
If the aerator is removable, rinse its screen, remove loose debris, and use only a descaling method approved for the finish. A pull-down sprayer can collect the same mineral crust; avoid soaking decorative finishes in vinegar unless the manufacturer permits it.
Remove the sink grate or bottom rack when possible and wash both sides. Food residue often collects around feet, joints, and rubber bumpers where a quick basin rinse cannot reach.
Good under cabinet lighting can make dried scale and residue around the faucet area easier to spot before buildup becomes heavy.
When the P-Trap or Drain Pipe Is the Real Problem
If a drain stays slow or smelly after the strainer and disposal are clean, the problem may be farther down the plumbing. The P-trap is the curved pipe under the sink that holds water and helps block sewer gases.
Before touching the trap, check whether chemical drain cleaner was recently used. Do not open the plumbing if corrosive cleaner may still be sitting inside because it can splash during disassembly.
Some accessible slip-joint P-traps can be removed for cleaning, but stop if fittings are corroded, seized, leaking, or unfamiliar. Use a bucket, keep track of washers, remove accessible debris, reinstall correctly, and check for leaks. Persistent sewer-like odor, repeated backups, or wall-pipe blockages need plumbing diagnosis.
Inspect the cabinet floor while you are under the sink. Swelling, peeling, or softness may indicate water damage, and different kitchen cabinet materials respond to leaks in different ways.
Visible mold under the sink should prompt a moisture check because cleaning alone will not fix the source.
Mistakes That Damage Sinks or Make Odors Worse
The biggest mistake is treating every mark, smell, or slow drain with a stronger chemical. Identify the material and the source first, because repeated cleaning can damage a finish without solving the underlying problem.
Avoid steel wool on scratch-prone sinks, and do not use abrasive powders on a finish unless its care instructions allow them. Acidic cleaners can also damage some stone, composite, enamel, or specialty surfaces.
Do not pour grease or cooking oil down the drain. Grease can cool and cling to pipe walls, where it traps food particles and contributes to slow drainage.
Never mask a recurring drain odor with fragrance alone. If the smell returns quickly, clean the strainer, splash guard, disposal, and P-trap before assuming the sink itself is dirty.
Store cleaning chemicals so leaks are easy to notice. Practical cabinet storage ideas can keep bottles upright and separated from food-related items. Keep powered small kitchen appliances away from sink splashes and unplug suitable equipment before wiping around its base.
How Often Should You Clean a Kitchen Sink?
Clean visible food residue and fresh spills after use, then wash the basin whenever grease or film begins to build up. A heavily used family sink may need a quick daily wash, while a lightly used sink may need less frequent attention.
Clean strainers, splash guards, faucet bases, and sink grates when slime, odor, or mineral deposits appear. Dry water-prone finishes after use if hard water leaves visible spots.
Keep the Sink Easier to Clean
The safest answer to how to clean kitchen sink surfaces is to start mild, match the cleaner to the material, and treat drain problems separately from basin stains.
Wash away food residue before it dries, clean strainers and splash guards before they smell, and dry water-prone finishes when needed. If odor, leaks, or slow drainage keep returning after accessible parts are clean, stop adding products and solve the plumbing or appliance problem instead.