
Quick Answer
The best small kitchen renovation ideas focus on two things: removing visual clutter and finding storage in places you never thought to look.
Paint your cabinets a warm light color, run them to the ceiling, and add LED lighting underneath. Those three changes alone can make a small kitchen feel completely different.
| Category | Answer |
|---|---|
| Best idea | Run cabinets to the ceiling — double storage and draw the eye up. |
| Cheapest idea | Paint cabinets + LED tape lights under uppers. Under $300 total. |
| Most effective idea | Light monochromatic color scheme — removes visual breaks and makes the room feel twice as large. |
| Best for storage | Pull-out pantry inserts + toe-kick drawers — unlocks space most kitchens ignore completely. |
| Best for very small kitchens | Compact rolling island — extra prep space when needed, out of the way when not. |
15 Best Small Kitchen Renovation Ideas
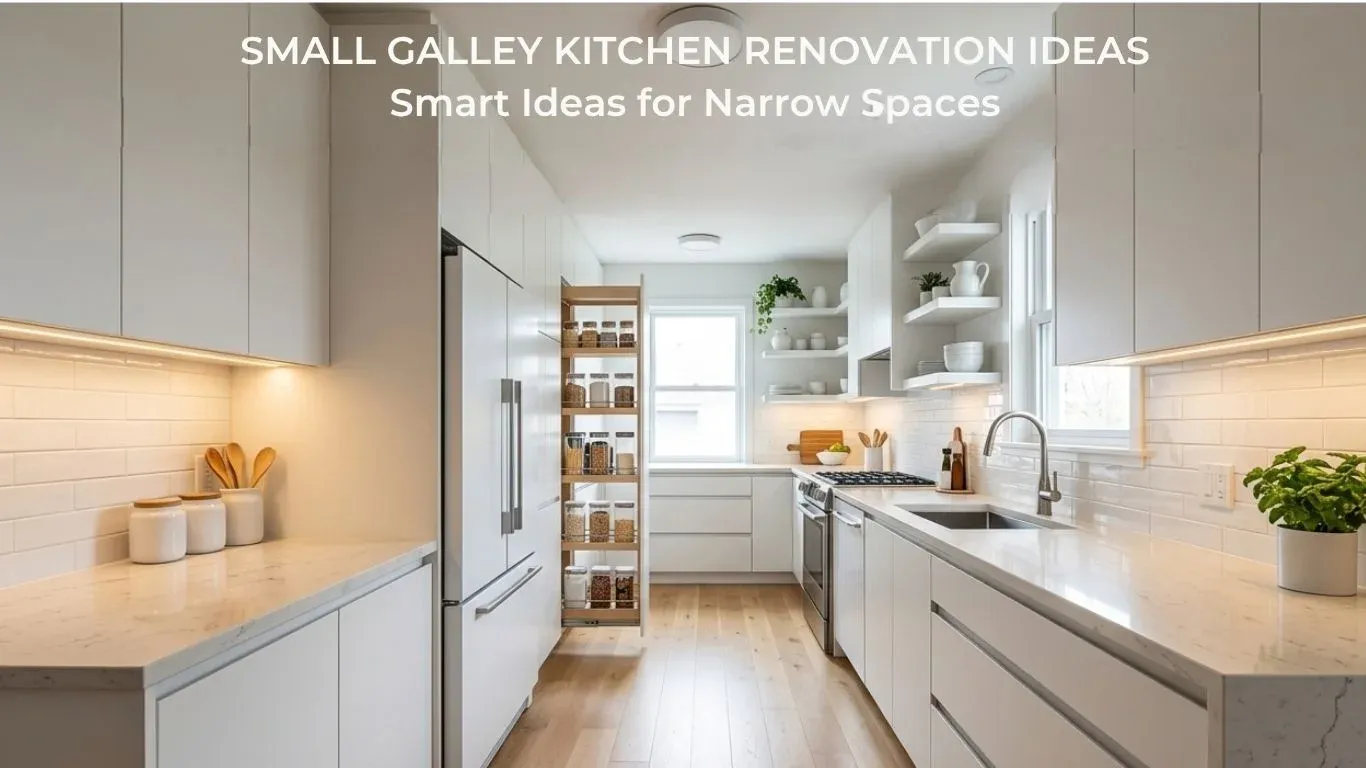
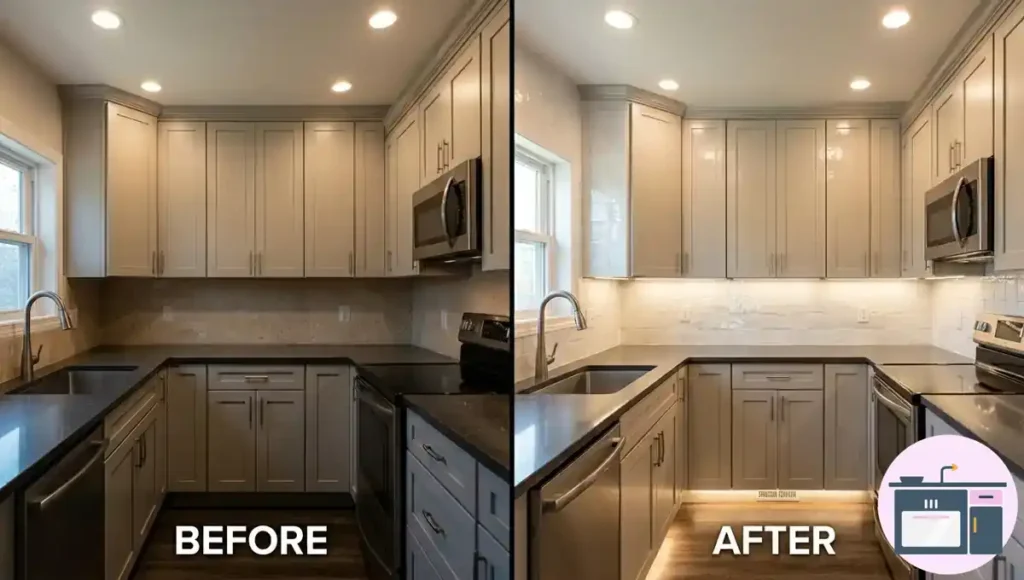
1. Run Cabinets to the Ceiling
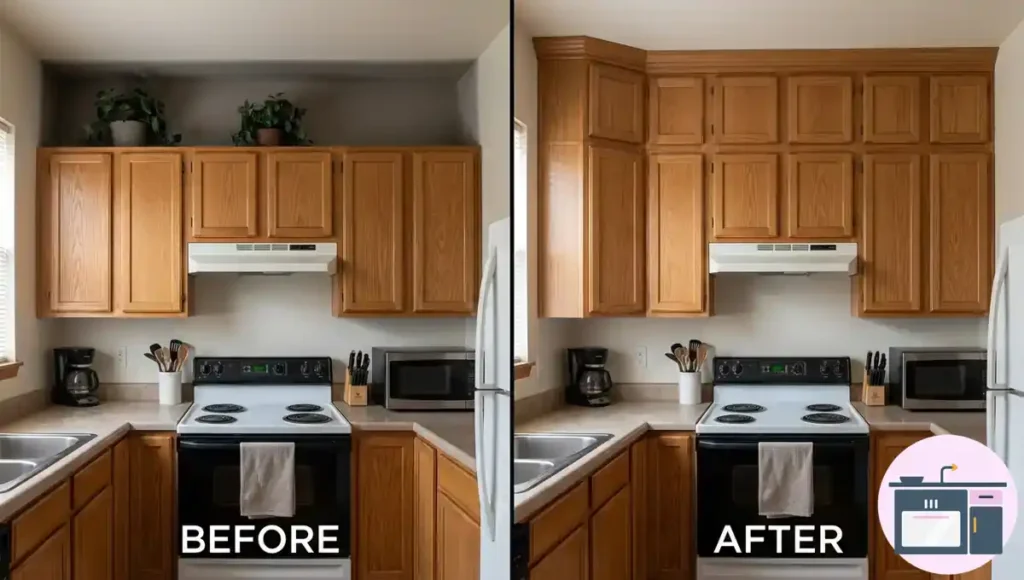
That gap between your upper cabinets and the ceiling collects dust and makes the room feel short. Running cabinets all the way up removes that dead zone, draws the eye upward, and adds real usable storage.
Real Example: A homeowner in a 90 sq ft condo ran her cabinets to the ceiling and gained 18 cubic feet of storage. The kitchen felt taller without touching a single wall.
| Pro Tip: Can’t afford full custom ceiling-height cabinetry? Install open floating shelves or a matching solid wood soffit board painted the exact tone of your boxes in that top zone instead. It gives the same seamless visual lift for a fraction of the cost. If you are wondering how these configurations vary, check out the various types of kitchen cabinets to find the best fit for your home. |
2. Install Integrated (Panel-Ready) Appliances
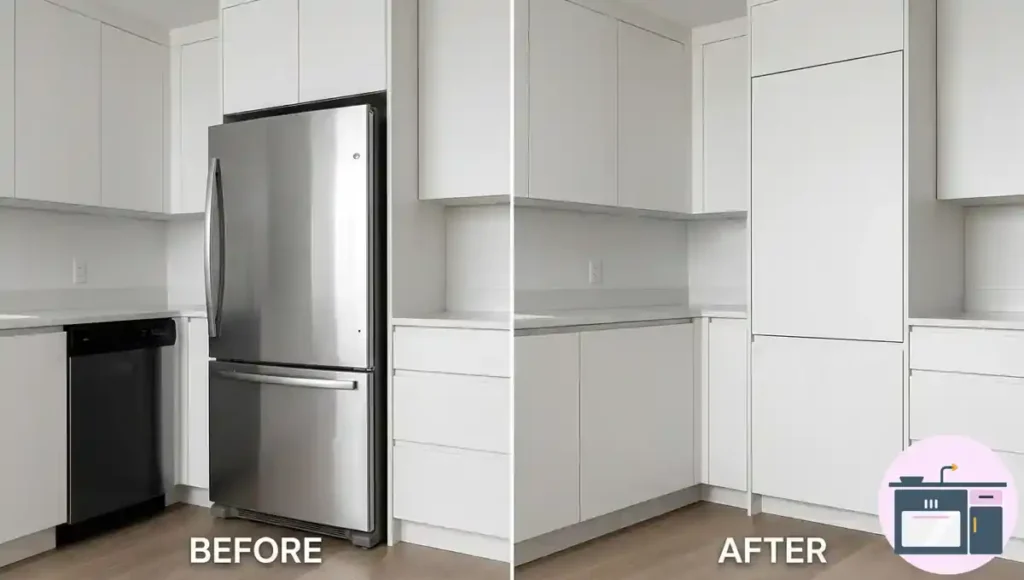
Standard stainless appliances break up the visual flow of a small kitchen. Panel-ready appliances are covered in cabinet-matching panels so they disappear into the cabinetry — your eye sees one continuous surface instead of appliance interruptions.
Real Example: A couple in a 55 sq ft Chicago galley kitchen swapped their freestanding fridge for a counter-depth panel-ready unit. It reduced the visual footprint by 8 inches and opened the whole space.
| Common Mistake: Buying standard-depth appliances to save money. A standard fridge sticks out 6–8 inches further than counter-depth and makes a small kitchen feel permanently crowded. |
3. Add Pull-Out Pantry Inserts
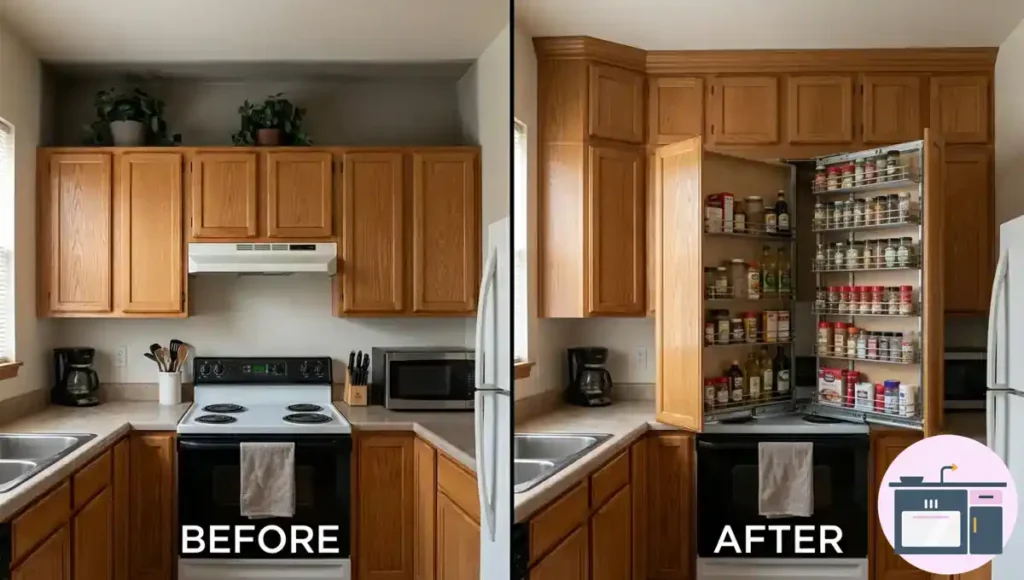
A pull-out pantry converts a narrow 6–9 inch cabinet into a fully visible storage column. You see every item at a glance — no more digging. Stores 2–3x more per linear foot than a fixed shelf.
Real Example: A home chef turned one barely-usable narrow cabinet into her most-used storage spot — spices, oils, canned goods, all visible and reachable at a glance.
| Pro Tip: Rev-A-Shelf and IKEA SEKTION both make inserts that fit inside existing cabinet boxes. No full renovation needed. |
4. Build Toe-Kick Drawers
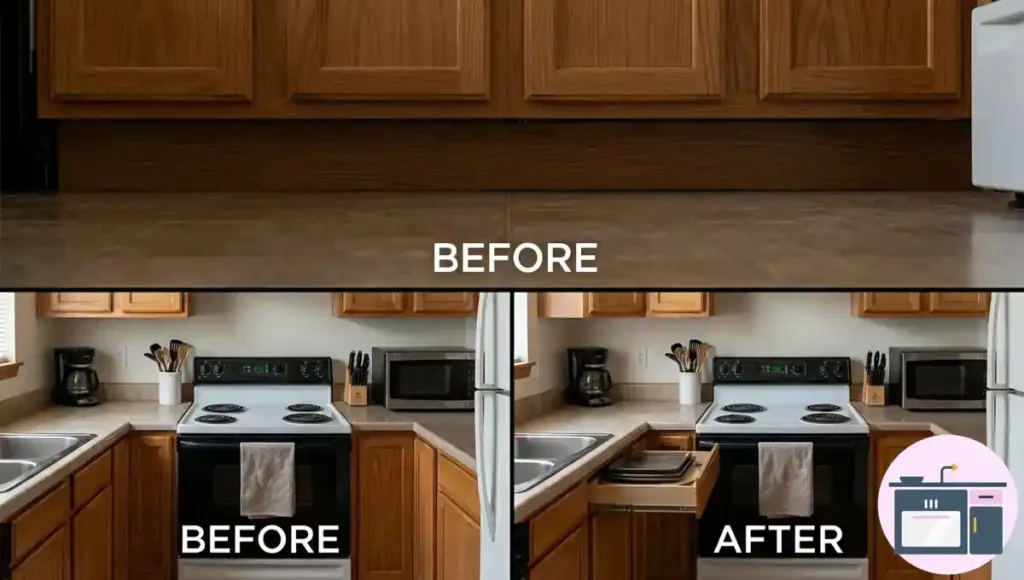
The recessed space at the bottom of your base cabinets is almost always empty. Shallow drawers here hold baking sheets, cutting boards, pot lids, and placemats — items that eat up prime cabinet space. Most kitchens have 4–6 feet of usable toe-kick space being completely wasted.
Real Example: A homeowner with a U-shaped kitchen installed toe-kick drawers under three cabinets, moved her baking sheets out, and freed an entire base cabinet for everyday pots and pans.
| Pro Tip: Rev-A-Shelf pre-made toe-kick drawer systems run under $150 per unit. A solid weekend DIY project if you’re comfortable with basic carpentry. |
5. Design an Appliance Garage
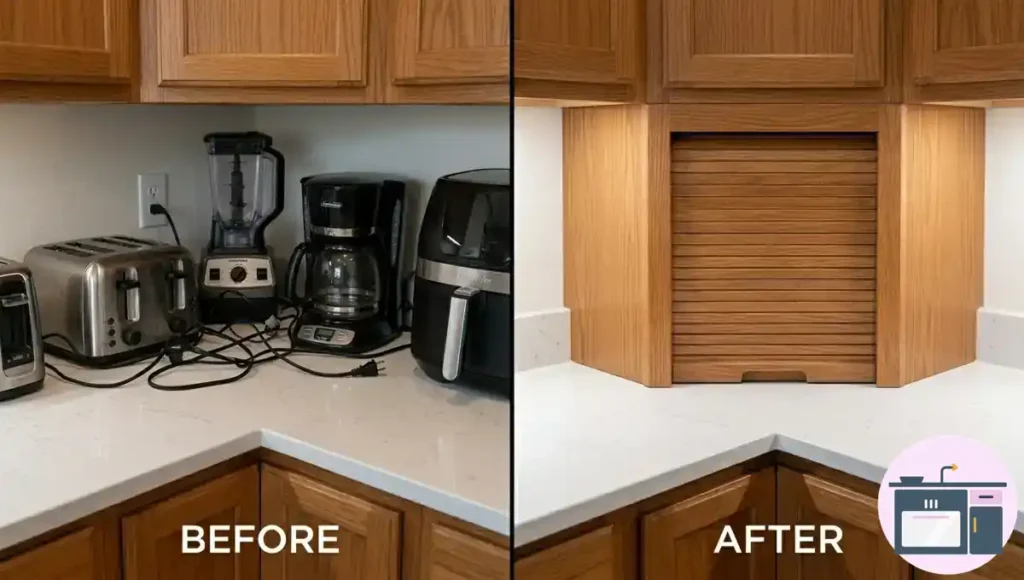
Toasters, coffee makers, air fryers — counter appliances are the biggest visual clutter contributors in a small kitchen. An appliance garage is a cabinet section at counter height with a rollup door. Everything hides when not in use and counter space is instantly reclaimed.
Real Example: A family built an appliance garage into a corner cabinet. When guests arrive, the door goes down and the kitchen looks completely clear.
| Common Mistake: Building the garage without an outlet inside. Always wire an outlet in the back wall so appliances don’t need to be dragged out every time they are used. |
6. Use Open Shelving Near Windows
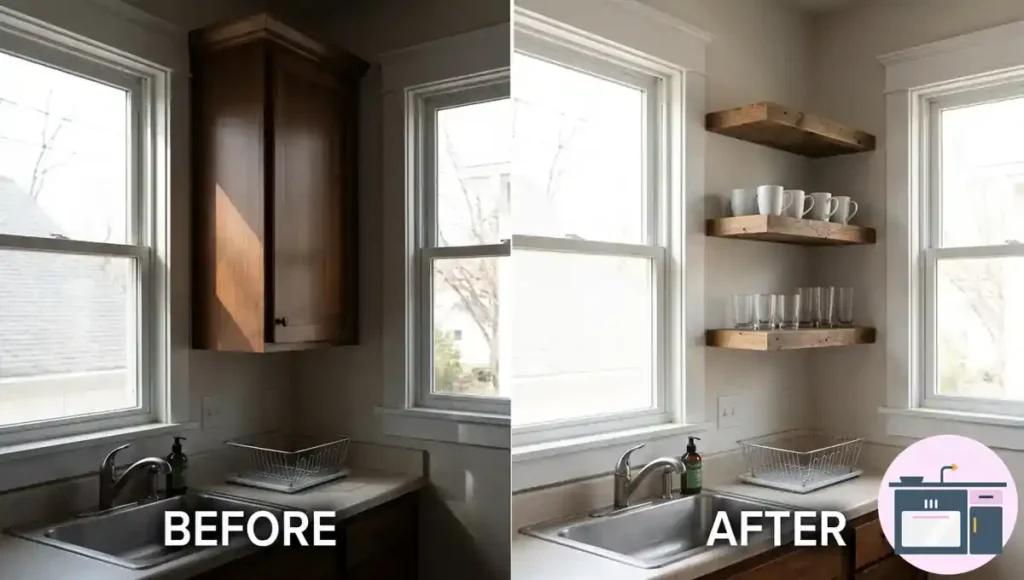
Solid cabinet doors near a window block natural light and make a small kitchen darker. Open shelves let light pass through, keep sightlines open, and cost much less than upper cabinets.
Real Example: A renter removed one set of upper cabinet doors near her window and replaced them with floating shelves. The kitchen felt measurably brighter immediately.
| Pro Tip: Style open shelves with items you actually use daily. Rarely-touched decorative pieces collect grease and dust within weeks and make the kitchen look messy fast. |
7. Layer Natural and LED Light
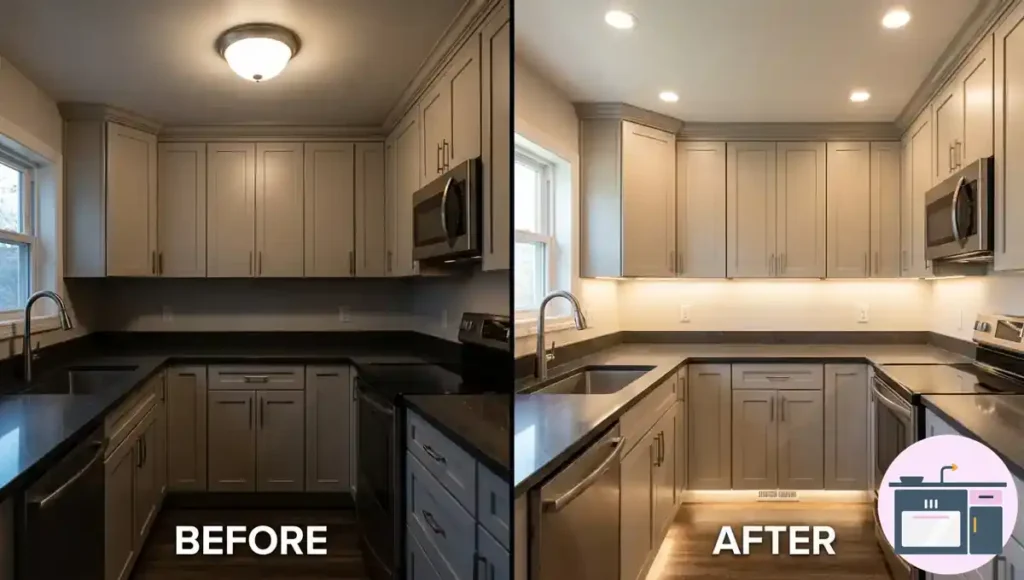
One overhead light creates shadows on every counter. Layering means combining your ceiling light with under-cabinet LED strips and a window treatment that maximizes daylight. Three light sources eliminate shadows and make the space feel larger and easier to work in.
Real Example: A homeowner with a north-facing kitchen added warm-white LED tape under all upper cabinets. She said it made a bigger difference than painting the walls.
| Pro Tip: Use 2700K–3000K warm white LEDs. Cooler tones (5000K+) feel clinical and harsh in a kitchen. Warm tones make the space feel inviting. |
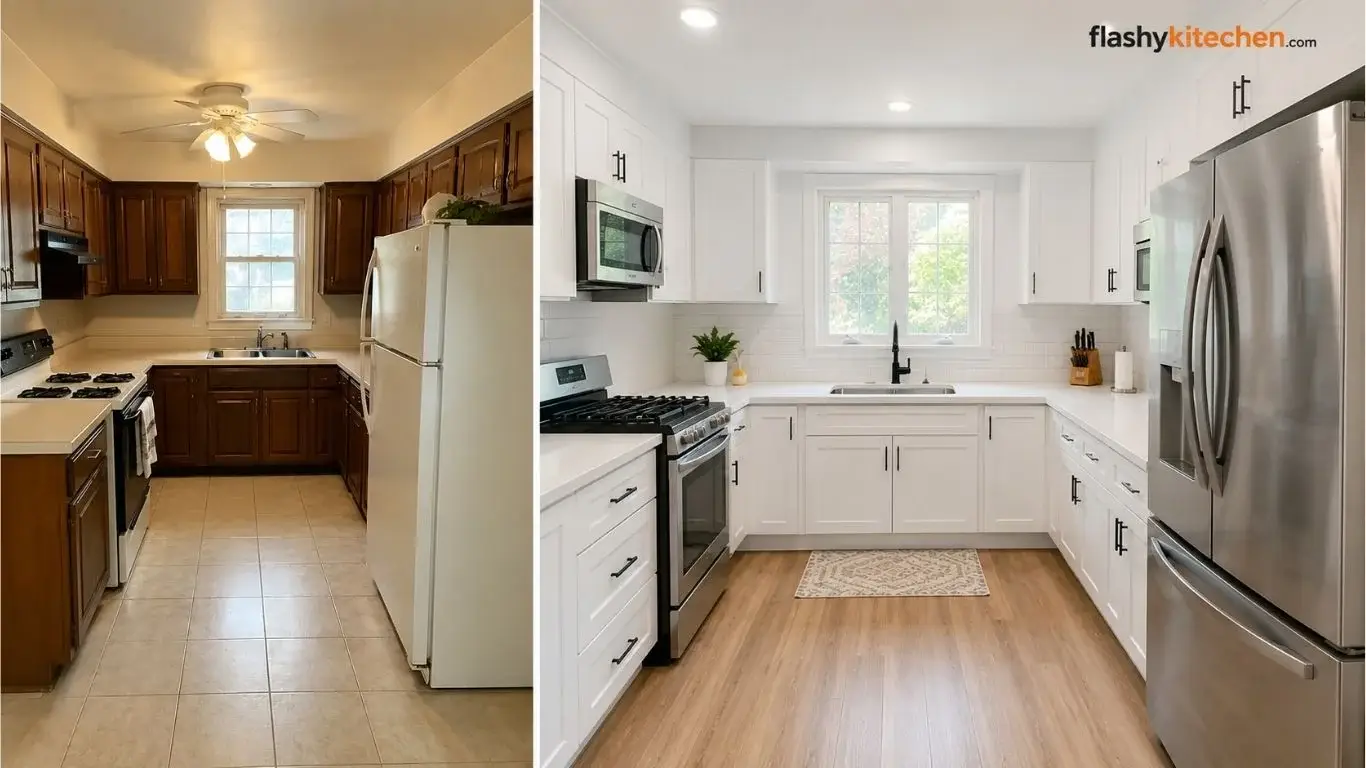
8. Use Light Monochromatic Colors
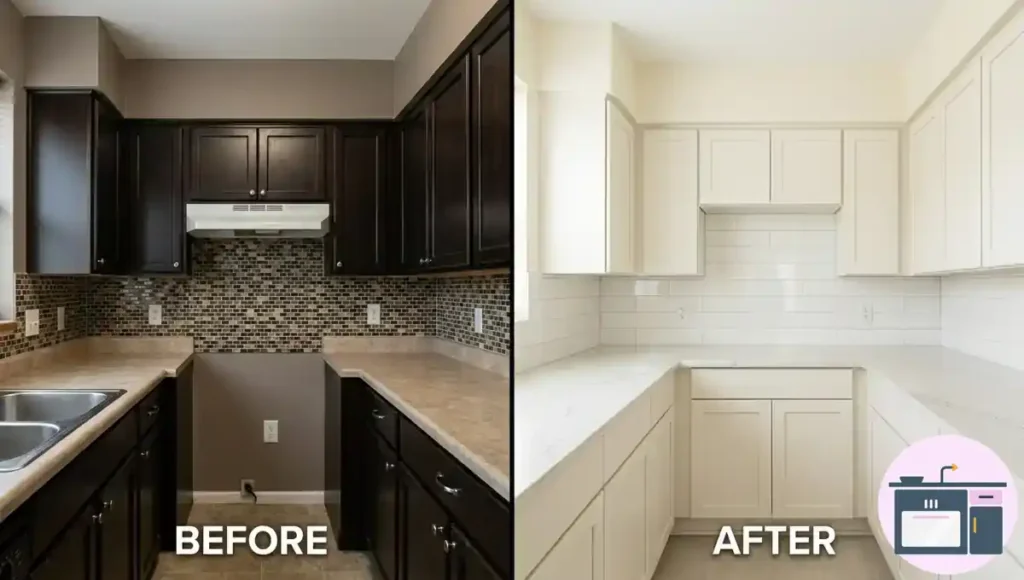
When cabinets, walls, and backsplash are all different colors, your eye registers multiple visual stops. Each stop makes the room feel smaller. A monochromatic scheme — where everything reads as one continuous surface — removes those stops and opens the room visually. To see what colors are ruling the charts this year, you can explore the latest kitchen cabinet color trends 2026.
Real Example: A small galley kitchen renovated with warm white cabinets, cream subway tile, and light beige walls became the most-shared photo in a designer’s portfolio. The footprint didn’t change. Only the color did.
| Common Mistake: Choosing stark white. It shows every mark, reflects harshly in small spaces, and looks dated quickly. Warm whites like Benjamin Moore Chantilly Lace or Sherwin-Williams Alabaster work far better. |
9. Add Sage Green Accents
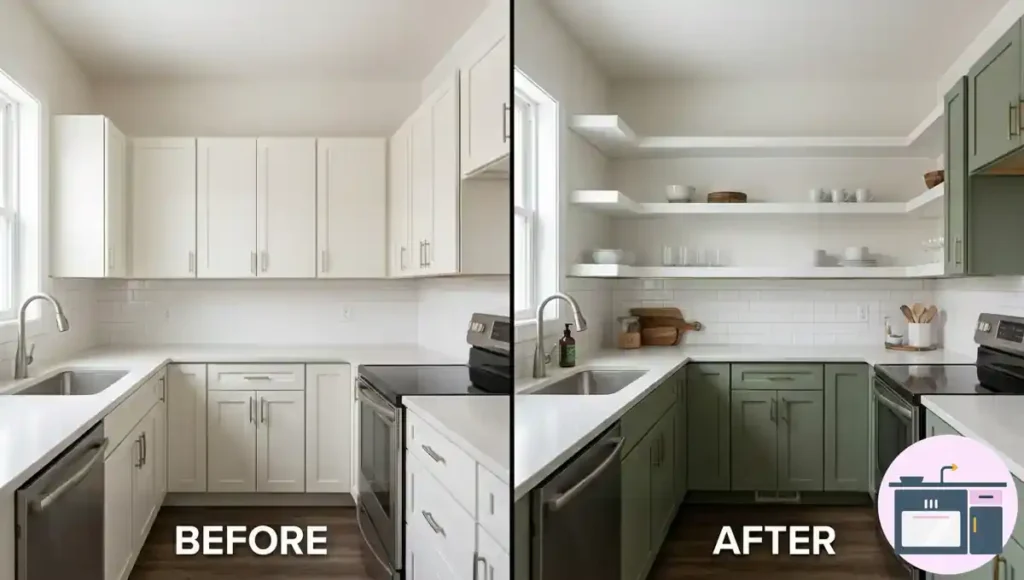
Sage green reads as neutral but adds warmth and depth. It works with wood tones, white walls, brass hardware, and most countertop options — adding personality without the visual weight of a darker color.
Real Example: A homeowner painted lower cabinets sage green and kept uppers white. The two-tone effect gave the kitchen real dimension for under $400 in paint and hardware.
| Pro Tip: Always sample on your actual cabinet in your specific lighting before committing. North-facing kitchens make sage read slightly grey; south-facing kitchens bring out the warmth. If you are looking for celebrity-inspired elegant shades that blend beautifully with warm hardware, check out the popular Jaclyn Smith kitchen cabinet color palette for more inspiration |
10. Install a Reflective Backsplash
Glossy, reflective backsplashes bounce light around the kitchen. In a small space this creates the same effect as adding a light source — the room looks brighter and feels larger. Options include high-gloss subway tile, mirrored tile, polished marble, and glass mosaic.
Real Example: A kitchen designer installed full-height polished white ceramic tile from counter to ceiling in a 70 sq ft galley. The reflective surface made the kitchen feel twice as deep.
| Pro Tip: Large-format tile with minimal grout lines reflects more light than small tiles. Fewer visual breaks means more mirror effect. |
11. Choose Light Quartz Countertops
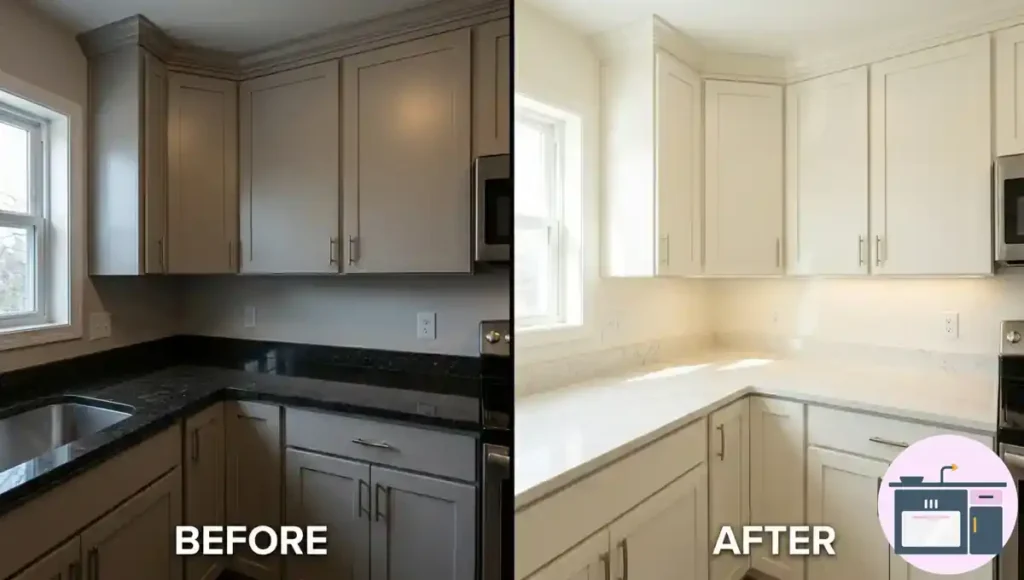
Dark countertops visually compress a small kitchen. Light quartz — whites, creams, pale greys — keeps sightlines open and reflects overhead light back into the space. Quartz is also non-porous, durable, and requires no sealing.
Real Example: A homeowner replaced dark granite with white quartz in a small L-shaped kitchen. Without changing anything else, the kitchen felt noticeably bigger — the dark stone had been absorbing light.
| Common Mistake: Choosing quartz with heavy veining. Dense patterns feel visually busy in a small space. Clean, minimal patterns keep the eye moving freely around the room. |
12. Mount an Undermount Sink
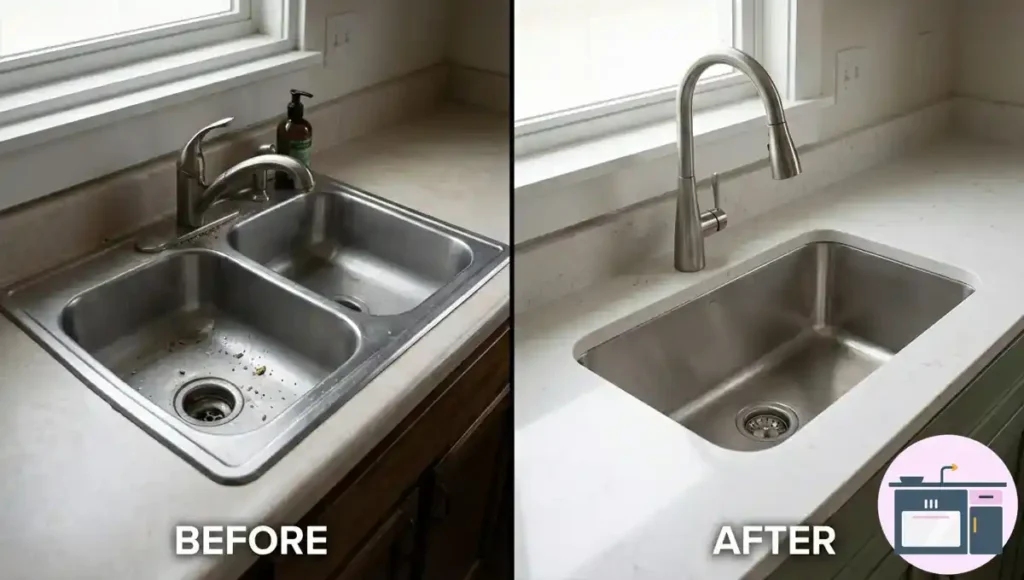
A drop-in sink has a visible rim sitting on top of the counter that creates a visual interruption. An undermount sink sits below the counter surface, creating one clean unbroken horizontal line — and in a small kitchen, clean horizontal lines read as extra length.
Real Example: A kitchen designer notes that clients consistently say the kitchen looks bigger after switching to an undermount sink — even though the sink itself is the same size.
| Pro Tip: Pair an undermount sink with a pull-down faucet. Together they make a small kitchen look professionally designed rather than standard builder-grade. |
13. Install a Pull-Down Faucet
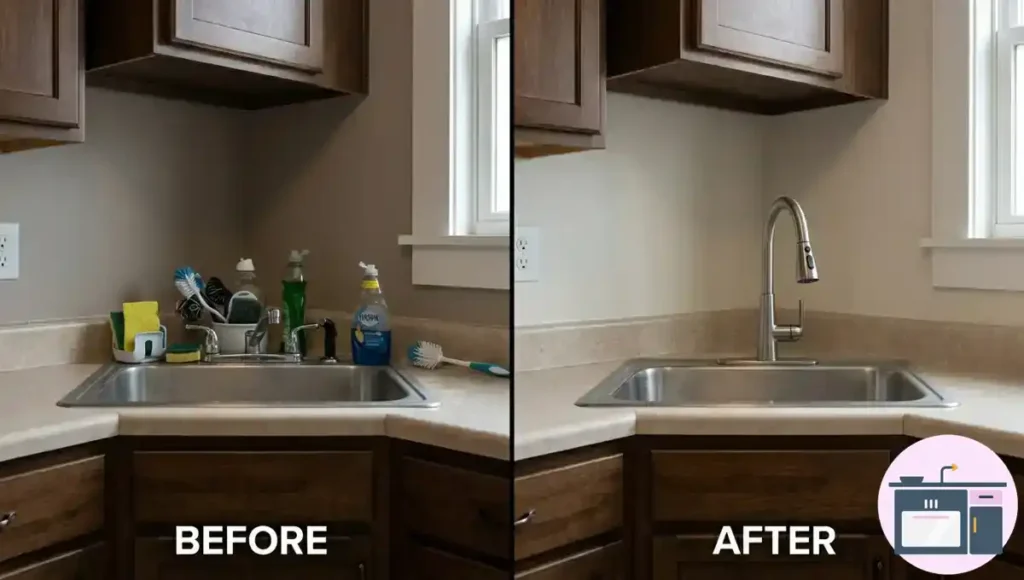
More flexibility than a standard faucet — fill large pots, rinse produce, and clean the basin without fighting the faucet head. In a small kitchen where counter space is tight, doing more work at the sink means doing less on the counter.
Real Example: A family who avoided cooking pasta because filling the pot was awkward found a pull-down faucet completely changed their kitchen workflow.
| Pro Tip: Look for a magnetic docking system so the head snaps firmly into position and doesn’t droop or swing. Delta and Moen both offer solid options under $200. |
14. Use Slide-Out Trash Bins
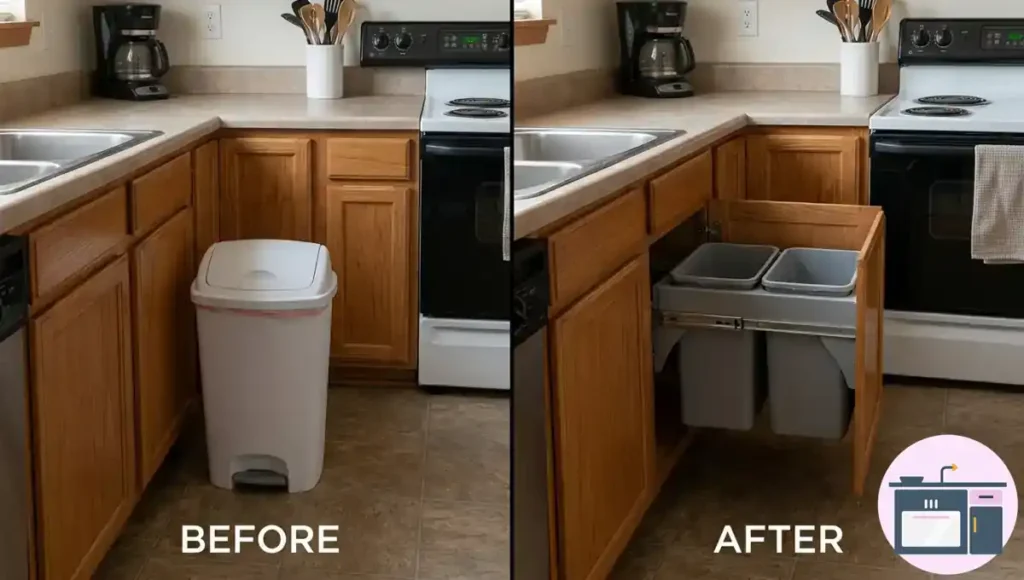
A freestanding trash can takes up floor space and adds permanent visual clutter. Slide-out bins mount inside a base cabinet and disappear completely. Most hold both trash and recycling side by side. You lose one cabinet but gain back floor space and remove a constant eyesore.
Real Example: A New York designer moved the trash from the kitchen floor into a pull-out under the sink. The floor opened up and the kitchen felt less cluttered immediately — no major renovation involved.
| Pro Tip: Position the slide-out near your prep area, not the other end of the kitchen. You will use it constantly during cooking and the shorter distance matters more than you think. |
15. Add a Compact Rolling Island

A rolling island gives you extra counter space and storage when you need it and rolls out of the way when you don’t. Works especially well in galley and U-shaped kitchens where a permanent island would block workflow.
Real Example: A homeowner with an 80 sq ft kitchen bought a butcher block rolling island from IKEA. She wheels it out during meal prep and tucks it against the wall the rest of the time — she calls it the single best purchase she made for her kitchen.
| Common Mistake: Buying an island that is the wrong height. Standard counter height is 36 inches. A rolling island higher or lower creates an awkward work surface. Always measure before buying. |
Quick Comparison: All 15 Small Kitchen Renovation Ideas
Use this table to compare ideas by cost, difficulty, storage gain, and visual impact before deciding where to invest.
| Renovation Idea | Est. Cost | Difficulty | Storage Gain | Visual Impact |
|---|---|---|---|---|
| Run Cabinets to Ceiling | $800–$2,500 | Medium | High | Very High |
| Integrated Appliances | $1,200–$4,000 | Hard | None | Very High |
| Pull-Out Pantry Inserts | $100–$400 | Easy | Very High | Medium |
| Toe-Kick Drawers | $100–$300 | Easy–Med | High | Low |
| Appliance Garage | $300–$900 | Medium | Medium | High |
| Open Shelving Near Windows | $50–$300 | Easy | Medium | High |
| Layer Natural + LED Light | $50–$200 | Easy | None | Very High |
| Light Monochromatic Colors | $150–$500 | Easy | None | Very High |
| Sage Green Accents | $200–$500 | Easy | None | High |
| Reflective Backsplash | $300–$1,500 | Medium | None | High |
| Light Quartz Countertops | $1,500–$4,000 | Hard | None | Very High |
| Undermount Sink | $400–$900 | Medium | None | Medium |
| Pull-Down Faucet | $150–$350 | Easy | None | Medium |
| Slide-Out Trash Bins | $80–$250 | Easy | Medium | High |
| Compact Rolling Island | $200–$600 | Easy | High | High |
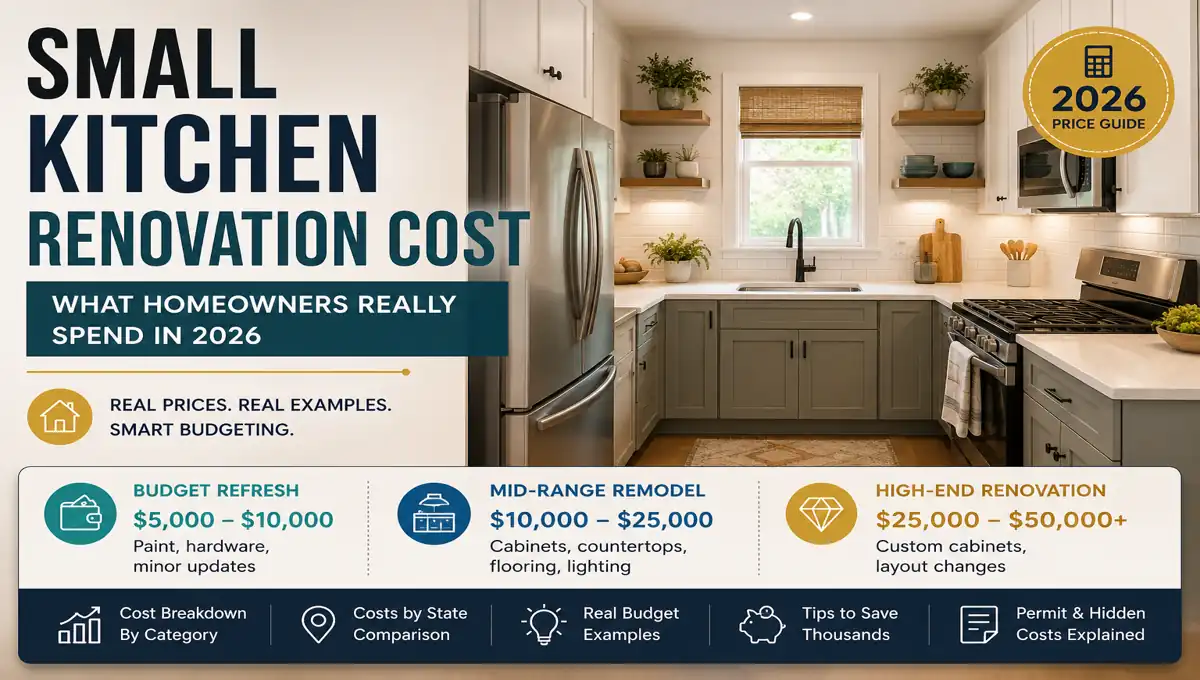
Small Kitchen Renovation Ideas on a Budget
Pick your budget range and start there. Every level delivers real, visible results.
- Under $300: Paint cabinets + LED under-cabinet tape lights. Biggest visual return per dollar in a small kitchen.
- $300–$800: Replace hardware, add peel-and-stick backsplash, install a rolling island. No contractor needed.
- $800–$2,500: Pull-out pantry inserts, toe-kick drawers, open shelving, undermount sink + pull-down faucet.
- $2,500–$6,000: Ceiling-height cabinet run, appliance garage, light quartz countertops.
- $6,000+: Integrated panel-ready appliances, full cabinet reface, reflective backsplash floor to ceiling.
While these ideas cover various price points, you might want a more detailed breakdown of labor and material expenses. For a complete estimate, read our article on small kitchen renovation cost.
Common Mistakes to Avoid
- Copying large kitchen designs — what works in big kitchens usually makes small kitchens worse.
- Ignoring vertical space — the wall above your cabinets is usable storage, not wasted air.
- Cluttering open shelves — they work only when they hold curated, everyday items.
- Blocking windows with solid upper cabinets — natural light is a design feature in a small kitchen.
- Starting with aesthetics, not workflow — map where you prep, cook, and clean first, then design around it.
- Choosing standard-depth appliances to save money — they stick out too far and make tight spaces feel worse.
- Forgetting an outlet inside the appliance garage — you will regret it the first day of use.
Final Thoughts
Small kitchen renovation ideas that work all do the same thing: reduce visual noise, hide clutter, and use light and color to make the space feel bigger than it is. Start with paint and lighting. Build toward cabinets and countertops as your budget allows.
For the complete planning guide — layouts, costs, and timelines — visit: Small Kitchen Renovation.