A kitchen island can add prep space, storage, seating, and appliances, but it only helps when the room can support it. The costly mistake is choosing the island first and checking circulation later. Start by measuring the clear space between existing counters, appliances, walls, and any floor-to-ceiling cabinets. Then reserve the aisles before deciding the island depth. By the end, you should know what size fits, how much seating works, what utilities are worth adding, what the project may cost, and when a peninsula, table, or rolling cart is the smarter option.
Quick Answer
A kitchen island should make cooking, storage, seating, or cleanup easier without making the room cramped. Plan the aisles first, then fit the island inside the space that remains.
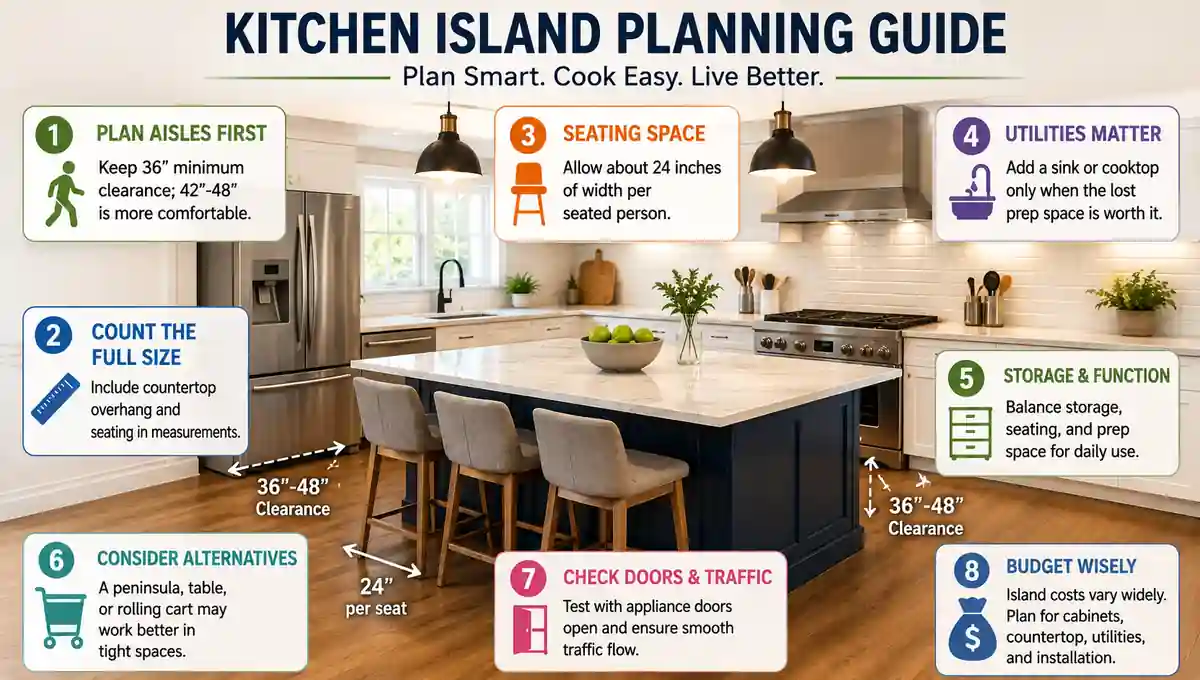
- Keep 36 inches of general clearance; 42 to 48 inches is more comfortable for active work.
- Count the full countertop footprint, including seating overhang.
- Allow about 24 inches of width per seated person.
- Add a sink or cooktop only when the lost prep space is worth it.
- Skip a fixed island if a rolling cart, table, or peninsula protects traffic flow better.
Will an Island Fit Your Kitchen?
An island fits only when the finished countertop leaves usable space on every active side. Do not measure from wall to wall and assume the empty center belongs to the island.
Current project guidance uses 36 inches as a general minimum around an island and 42 to 48 inches as a more comfortable working range. Those numbers are starting points, not a promise that every 36-inch aisle will work.
A small kitchen layout needs extra care because refrigerator handles, door swings, stools, and countertop overhang all consume space.
Before you measure, identify the surfaces that actually define each aisle. In most kitchens, that means the finished edge of a perimeter countertop on one side and the finished island countertop on the other. A refrigerator that projects past the cabinets can become the real measuring point.
Use the Clear-Span Calculation
Measure the clear distance between the finished surfaces that will face the island. Then subtract the aisle you want on each side.
For example, a 120-inch clear span with 42-inch aisles on both sides leaves:
120 − 42 − 42 = 36 inches
That gives you a 36-inch maximum finished island depth before adding anything else into those aisles. If stools occupy one side, or an oven opens into the other, reduce the island or increase that aisle.
Run the same calculation for the island length. Leave space at both ends for the path people actually use, not just the smallest number that fits on paper.
This simple calculation answers a better question than “What is the standard island size?” It tells you what your room can carry.
Before ordering anything, mark the finished footprint on the floor with painter’s tape. Open the refrigerator, oven, and dishwasher, then place a chair where each stool would sit. This does not replace a measured plan, but it quickly exposes corners and traffic conflicts that are easy to miss on a screen.
While comparing current sizing guidance with retail dimensions, one pattern stands out: product labels such as narrow, standard, and wide are shopping categories, not universal design standards. Measure the actual finished footprint instead of trusting the category name.
Is 36 Inches Around an Island Too Cramped?
Thirty-six inches can work as a basic passage, but it can feel tight in an active work zone. A dishwasher door, two open drawers, or a person standing at the sink can change the usable aisle quickly.
Think about the job of each side. A low-traffic end may need less room than the side facing a range, sink, refrigerator, or seating area. Where two people cook, 42 to 48 inches usually gives more comfortable movement than the bare 36-inch minimum.
Test the plan with appliance doors open. Measure from the farthest projecting point, not from the cabinet box behind it.
Seating changes the math again. A 42-inch gap behind an empty tucked stool is not the same as 42 inches behind a seated adult. If that side is also a main walkway, give people room to pass without asking the seated person to move.
An open-concept layout also needs a clean route through the room. The island should not force family members to cross the cooking zone just to reach another space.
Accessibility rules are a separate issue. Federal standards for covered kitchens require at least 40 inches in qualifying pass-through kitchens and 60 inches in qualifying U-shaped kitchens. Those rules do not mean every private home needs a 60-inch island aisle.
If accessibility is part of your project, use the applicable standard and local requirements rather than a general kitchen rule.
What Size Should a Kitchen Island Be?
The right kitchen island size comes from the room, not from a universal width. First reserve the required aisles, then use the remaining footprint for cabinets, seating, or appliances.
A standard-height island commonly aligns with a 36-inch kitchen countertop. Higher bar sections can reach about 42 inches and need taller stools. Current countertop manufacturer guidance pairs a 36-inch counter with roughly 24-inch counter stools and a 42-inch counter with roughly 30-inch bar stools.
| Planning item | Useful starting point | What changes it |
|---|---|---|
| General clearance | 36″ minimum | Traffic and door swings |
| Active work aisle | 42″–48″ | Two cooks or busy appliances |
| Seating width | About 24″ per person | Wide stools and armrests |
| Seating overhang | About 12″–18″ | Counter material and support |
Current countertop manufacturer guidance places typical seating overhangs around 12 to 18 inches. A second countertop manufacturer recommends at least 24 inches of width per person.
Depth deserves as much attention as length. A deeper island gives more prep surface, but the middle can become hard to reach. It also takes inches away from the aisles on both sides.
A long island may work well when prep, cleanup, and seating need separate zones. It becomes wasteful when the extra length only creates a long walk around the ends.
How Much Seating and Storage Can You Fit?
Island seating works when each person has enough width, knee room, and space behind the stool. A useful starting point is about 24 inches of countertop width per person.
A four-seat island therefore needs more than a listing that simply says “seats four.” Check where waterfall panels, cabinet ends, support posts, and table legs reduce the usable knee space.
The overhang matters too. A seating area often needs about 12 to 18 inches beyond the cabinets, and deeper stone overhangs may require extra support. Confirm the allowed projection with the fabricator for the exact slab and thickness.
Seat height must match counter height. Counter-height stools sit lower than bar stools, so mixing the two can leave too little knee space or an awkward eating height. Current countertop manufacturer guidance places counter stools around 24 inches high for a 36-inch counter and bar stools around 30 inches for a 42-inch counter.
Storage and seating compete for the same footprint. A kitchen island with storage can use deep drawers, doors, shelves, or a trash pull-out. Seating removes some of that cabinet volume to create knee space.
If storage is the bigger problem, protect it. Well-planned cabinet storage ideas may give you more daily value than stools that get used a few times a month.
For a narrow island with seating, draw the stools at their occupied depth. A tucked stool is not the same size as a seated person.
Fixed, Freestanding, Rolling, or Table-Style?
Choose the least permanent option that solves the actual problem. A rolling island or island cart can add work surface and storage without plumbing, wiring, or permanent cabinetry.
A portable island is useful in a rental, small kitchen, or room where the main aisle changes during cooking. Locking casters matter because the unit should stay still while you chop or set down hot food.
A freestanding island works more like furniture. It can provide drawers and shelves without becoming part of the cabinet installation.
An island table or dining-table hybrid gives up cabinet storage for open legroom. It suits households that need eating space more than another row of drawers.
A fixed island earns its cost when you need integrated cabinets, appliances, plumbing, or a permanent work zone. It also makes sense when the island anchors a large room and its position will not need to change.
If you only want another 2 feet of prep surface, permanent construction may solve a problem you do not have. A movable unit can deliver much of the benefit while keeping the floor flexible.
Should the Sink or Stove Go in the Island?
Put a sink or cooktop in the island only when it improves the work zones enough to justify lost countertop and added construction. A clear island often gives better uninterrupted prep space.
An island with a sink can place cleanup near the dishwasher, but the sink bowl, faucet, plumbing, and splash area consume counter and cabinet space. An island with a sink and dishwasher also needs enough aisle for the dishwasher door to open without blocking the route.
A cooktop adds another layer. You need useful landing space beside the cooking surface, proper ventilation, safe seating distance, and the correct electrical or gas connection.
Before choosing either setup:
- Map the sink, range, and refrigerator as work zones.
- Draw every appliance door open.
- Keep seating away from the hot cooking edge.
- Confirm the plumbing and electrical rough-in route.
- Check permit and licensed-trade requirements locally.
A rough-in is the hidden plumbing, wiring, or gas work installed before finished fixtures go in.
Utility routing can also change the project. Access from a basement or crawl space may be simpler than work over a concrete slab. The exact route, permit, and trade requirements depend on the house and local rules, so settle them before cabinets are ordered.
Ventilation is another reason to decide early. An island cooktop cannot simply borrow a wall hood location. The appliance and hood plan need compatible clearances, duct routing, and power. Do not order cabinets until those requirements are known.
Electrical advice from older island articles can now be wrong. The National Fire Protection Association updated its island and peninsula receptacle guidance through the 2026 National Electrical Code. Local authorities may still enforce an earlier edition, so confirm the rule that applies to your address before construction. As of August 3, 2026, only six states had the 2026 NEC in effect.
Plan kitchen lighting ideas after the final island position is set. Pendant locations should follow the finished countertop, not an early sketch.
Which Countertop Material Makes Sense?
Choose the countertop for how you will use the island. A prep-heavy surface, a seating bar, and a decorative waterfall edge place different demands on the material.
Butcher block gives a wood work surface, with care depending on the finish used. Marble can etch when acids contact the surface. Some natural stones benefit from an impregnating sealer, while others may not need one, so ask the stone supplier about the exact slab. Engineered quartz is nonporous, but the fabricator still controls safe overhang and support details.
A stainless steel top suits a work-first island where easy cleanup matters more than matching traditional cabinetry. A solid wood island works well as furniture but still needs a kitchen-safe finish.
A waterfall island carries the countertop material down one or both ends. That uses more material and can remove seating or open legroom at the end.
Do not assume all countertop materials support the same overhang. Current quartz manufacturer guidance, for example, limits unsupported projection based on slab depth and support. Use the fabricator’s specification for your selected surface rather than copying a generic number.
This is one place where paying for a larger slab does not automatically improve the island. An oversized top that forces support posts into knee space can make seating worse.
How Much Does an Island Cost in 2026?
Kitchen island cost changes sharply by project type. A rolling cart, a stationary prefab unit, and a custom island with utilities should never share one vague price range.
Published U.S. planning ranges updated July 8, 2026 separate the project this way.
| Island type | Published range | Typical scope |
|---|---|---|
| Prefab rolling cart | $150 to $900 | Movable work surface and storage |
| Stationary prefab island | $900 to $5,000 | Ready-made furniture-style unit |
| Custom island | $3,000 to $10,000 | Custom cabinets, materials, and features |
Prices vary by region and by whether labor, countertop fabrication, appliances, permits, plumbing, and electrical work are included. A local quote should define those items separately.
Utilities can move the project into a different cost class. The same July 2026 source lists planning ranges of $400 to $1,500 for a sink, $500 to $1,900 for plumbing pipes, and $150 to $400 for GFCI outlet work.
Those line items are not automatically additive. A contractor may bundle some labor into a larger quote, while difficult routing can raise the real local price. Use them to identify what needs pricing, not to create a guaranteed total.
A DIY kitchen island can cut labor when the work is limited to cabinets, trim, and a countertop. One current stock-cabinet project is rated intermediate and planned for one weekend.
Stop the DIY route where regulated electrical, gas, or plumbing work begins. Permit and licensing rules vary by city, county, and state.
Ask who coordinates the separate trades before signing. Cabinet installation, countertop fabrication, plumbing, and electrical work may come from different contractors. If the quote excludes one of them, price that work before demolition starts.
Before accepting a quote, confirm what it includes: cabinet installation, countertop templating, demolition, disposal, flooring repair, electrical work, plumbing, permits, and appliance hookups. That check prevents a low-looking quote from becoming expensive through add-ons.
Island Design Ideas That Change How the Room Works
The most useful island design ideas start with the job, then choose the shape and finish. Color alone cannot fix a poor layout.
A modern island may use flat cabinet fronts and one counter height. A farmhouse-style island may use painted cabinetry, wood, or furniture-style details. White, black, blue, and green islands can all work if they connect with the surrounding cabinets, floor, or countertop.
An L-shaped island can separate prep and seating, but it needs more floor area. A curved or round island can soften a traffic corner, though custom cabinetry may raise the cost.
A double-island kitchen needs enough room for two useful zones plus clear aisles between them. Two islands in a room that barely fits one create more walking and less flexibility.
A waterfall edge changes both appearance and function because the side panel closes an end that might otherwise hold a seat.
The 2026 design decision worth following is not a specific color. It is giving the island a clear job. Prep, storage, cleanup, cooking, and seating can share one unit, but every added job consumes space somewhere else.
Can an Island Be Too Big?
An island is too big when people must change how they walk, open appliances, or work just to get around it. More countertop stops helping once the island becomes the obstacle.
These mistakes are expensive to reverse:
- Shrinking an active aisle to gain a few more countertop inches.
- Counting tucked stools as if occupied seating takes no space.
- Adding a sink that removes the prep area you needed most.
- Placing an appliance where its open door blocks the main route.
- Paying for custom cabinetry when a narrow table or rolling cart solves the same problem.
A peninsula is often the better alternative in a narrow room because it can add cabinets and countertop without requiring four-sided circulation. A work table is cheaper and keeps legroom open. A rolling cart can move out of the main aisle.
Doing nothing is also a valid design decision. If every island option makes the kitchen feel cramped, protect the open floor space.
Conclusion
Choose a kitchen island only after the room proves it can support one. Measure the clear span, reserve the working aisles, add the full seating overhang, and draw every appliance door open before ordering cabinets.
If the remaining footprint still gives useful prep, storage, or seating, build around that job. If the numbers only work by squeezing circulation, choose a peninsula, table, or rolling cart instead. The next step is a measured floor plan, not a product search.