
Staring into the cabinet under your sink can feel like looking at a plastic puzzle with no instructions. Whether you are tackling a new kitchen sink installation during a full remodel or just trying to fix a leak, understanding how wastewater escapes your home is critical.
Gravity, venting, and strict code measurements dictate exactly how these pipes must go together. Get it wrong, and you face slow drains, sewer gas smells, or ruined base cabinets.
By the end of this guide, you will understand the exact kitchen sink plumbing diagram you need, the dimensions required to pass inspection, and how to avoid the layout mistakes that ruin most DIY plumbing projects.
Quick Answer
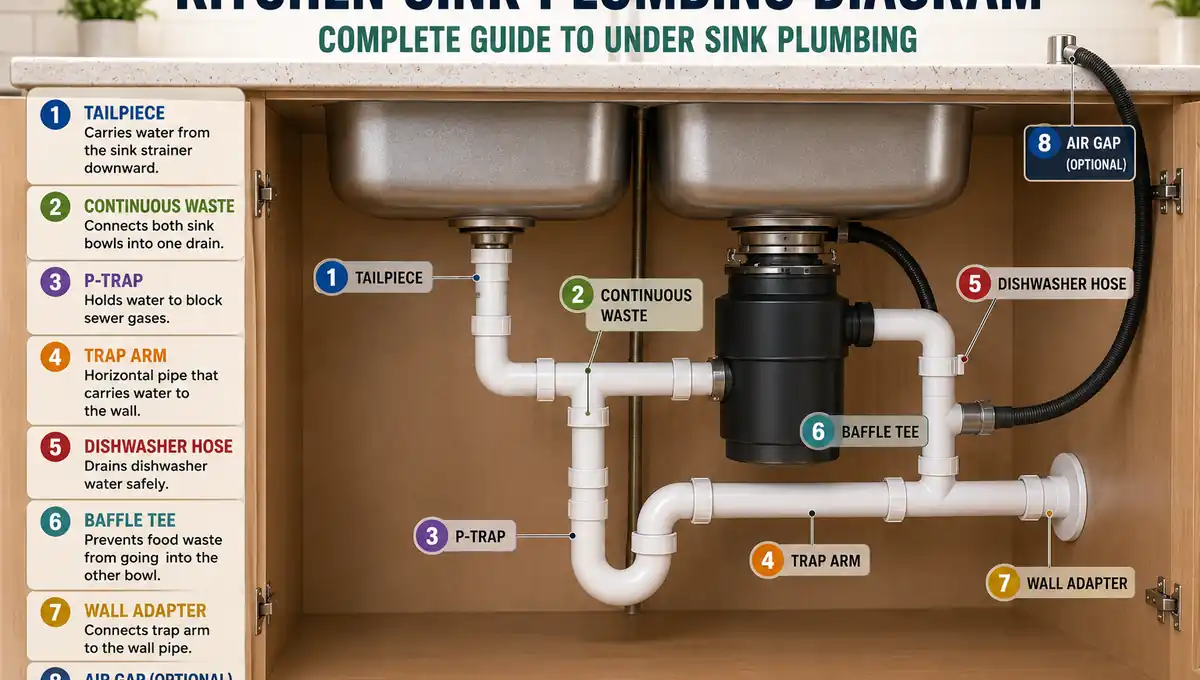
A proper kitchen sink plumbing diagram relies on gravity and a water seal to function safely. The system connects in a specific sequence. First, the tailpiece drops wastewater straight down from the sink strainer.
For double sinks, a continuous waste kit merges water from two drains into one pipe. Next, the P-trap holds water to block sewer gases from entering the kitchen. Finally, the horizontal trap arm slopes downward to carry water into the wall, meeting the sanitary tee that sends water to the sewer.
Anatomy of a Sink Drain: The Parts You Need to Know
A standard under kitchen sink plumbing diagram consists of a few highly specific tubular PVC or ABS parts. Modern residential drain pipes are almost always 1 1/2 inches in diameter. Before you start cutting pipe, you need to know what each piece does.
The system is held together by slip-joint nuts and beveled plastic washers. These allow you to hand-tighten the connections without gluing them, which is essential so you can take the system apart later to clear clogs. Any p trap proper kitchen sink plumbing diagram includes these core components:
| Part Name | What It Is | What It Does |
|---|---|---|
| Tailpiece | A straight vertical tube dropping from the sink drain. | Carries water away from the sink basket. Dishwasher tailpieces have a side branch for the drain hose. |
| Continuous Waste | A T-shaped or L-shaped pipe assembly. | Used in a double bowl layout to connect two sink drains into a single P-trap. |
| P-Trap | A U-shaped pipe holding a small pool of water. | The water seal physically blocks toxic sewer gas from rising out of the drain. |
| Trap Arm | A horizontal pipe connecting the P-trap to the wall. | Moves water into the main drain. It must slope downward at exactly 1/4 inch per foot. |
| Sanitary Tee | A specialized T-fitting inside the wall behind the drywall. | Directs wastewater downward to the sewer and allows venting air to travel upward. |
| Escutcheon | A decorative metal or plastic ring. | Hides the ugly hole in your cabinet back or drywall where the pipe exits. |
Standard Kitchen Plumbing Rough-In Dimensions
When you look at a kitchen sink plumbing rough in diagram, the most important details are the measurements. If the pipes coming out of your wall are in the wrong spot, no amount of under-sink PVC will fix it.
Across published figures from major hardware retailers and plumbing codes as of August 2026, standard rough-in heights look like this. (Prices and installation costs vary by region). If you need a height kitchen sink plumbing rough in diagram, follow these International Plumbing Code (IPC) guidelines:
| System Component | Standard Measurement | Code / Installation Notes |
|---|---|---|
| Drain Rough-In Height | 16 to 20 inches (18″ is standard midpoint) | Measured from the finished floor to the center of the drain pipe in the wall. |
| Supply Line Height | 20 to 24 inches | Hot and cold water lines usually sit slightly higher and outside the drain pipe. |
| Drain Pipe Diameter | Minimum 1 1/2 inches | Required by the IPC for all residential kitchen drainage. |
| Maximum Trap Depth | 24 inches | The P-trap cannot sit more than 24 inches below the sink drain, or falling water siphons the trap dry. |
| Trap Arm Slope | 1/4 inch per foot | The pipe connecting the trap to the wall must tilt slightly to drain properly. |
Notice that retailer listings often measure nominal sink depth, while contractors estimate based on the interior usable space plus the countertop thickness. A 9-inch sink under a 1 1/2-inch quartz counter drops your drain starting point 10.5 inches below the deck, heavily impacting that rough-in height.
Single Bowl Kitchen Sink Plumbing
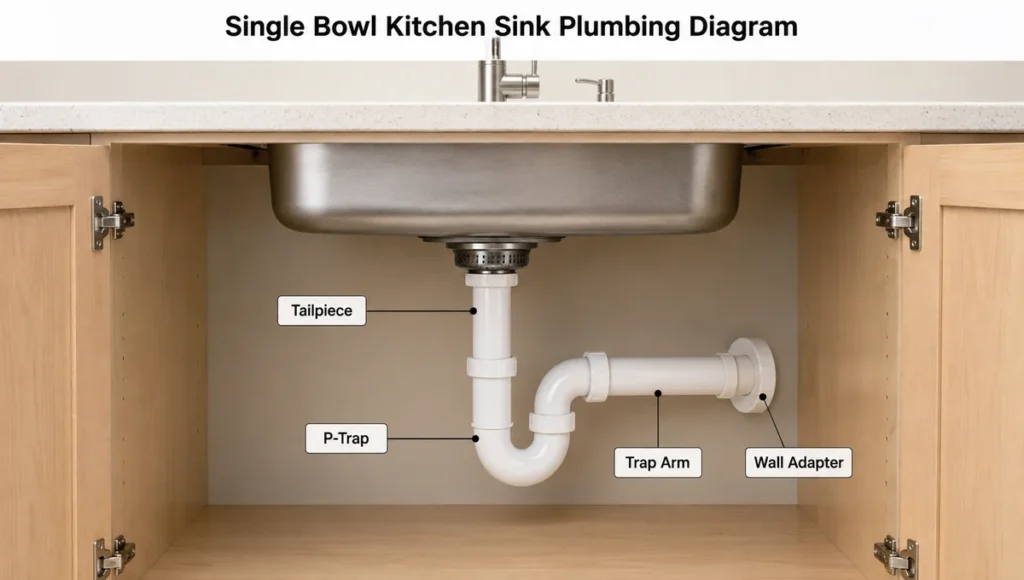
A proper single kitchen sink plumbing diagram is the easiest layout to master because it relies on a straight, vertical drop. This setup is incredibly common in modern remodels, as massive, single-basin farmhouse sinks have replaced older split-basin designs.
In a single bowl kitchen sink plumbing diagram, a flanged tailpiece attaches directly to the bottom of the sink strainer. This drops straight down into the P-trap. The other side of the P-trap connects to the trap arm, which slides straight into the wall adapter.
When planning this layout, keep the tailpiece as short and direct as possible. If the wall drain is offset to the left or right of the sink center, you can pivot the P-trap on its slip joints to swing it over to meet the wall pipe. You do not need to add complex elbows to a single kitchen sink plumbing diagram just to reach an offset wall drain.
Double Bowl Kitchen Sink Plumbing
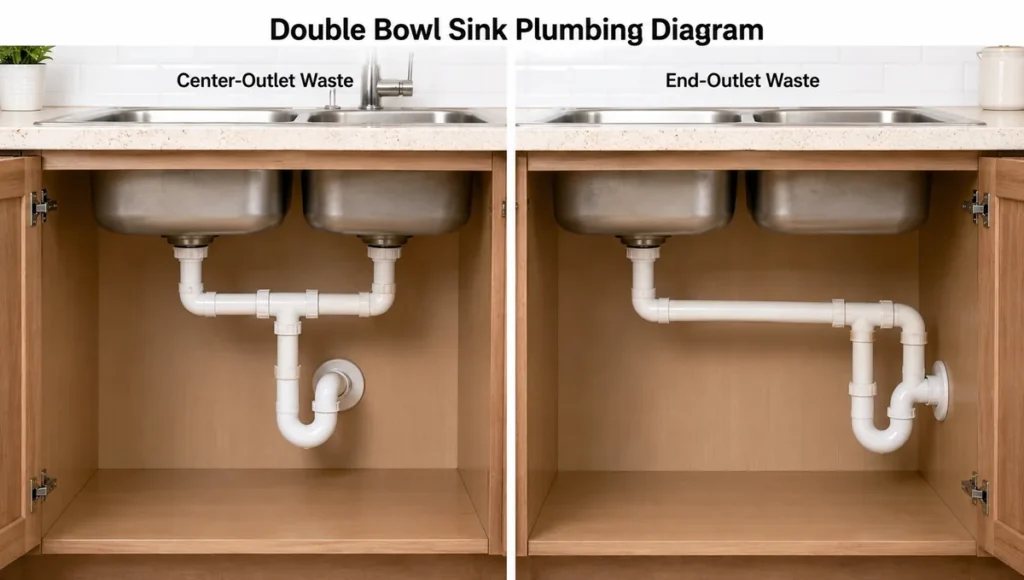
A double kitchen sink plumbing diagram introduces a new piece of hardware: the continuous waste kit. Because you have two drains but only one pipe in the wall, you must merge the wastewater before it hits the P-trap.
To build a double bowl proper kitchen sink plumbing diagram, you have two options for routing the water:
- Center-Outlet Waste: Both sink basins drop into a T-shaped fitting in the middle, which then drops into a single P-trap.
- End-Outlet Waste: One basin drops into an L-shaped pipe that runs horizontally across to a T-fitting under the second basin. The water then drops into the P-trap.
End-outlet setups are usually preferred because they push the plumbing to one side of the cabinet. If you are researching a kitchen island layout, pushing the plumbing to the side frees up massive amounts of storage space in the center for slide-out trash cans or large pots. Just ensure the horizontal pipe joining the two drains slopes slightly downward toward the trap.
Kitchen Sink Plumbing With Garbage Disposal
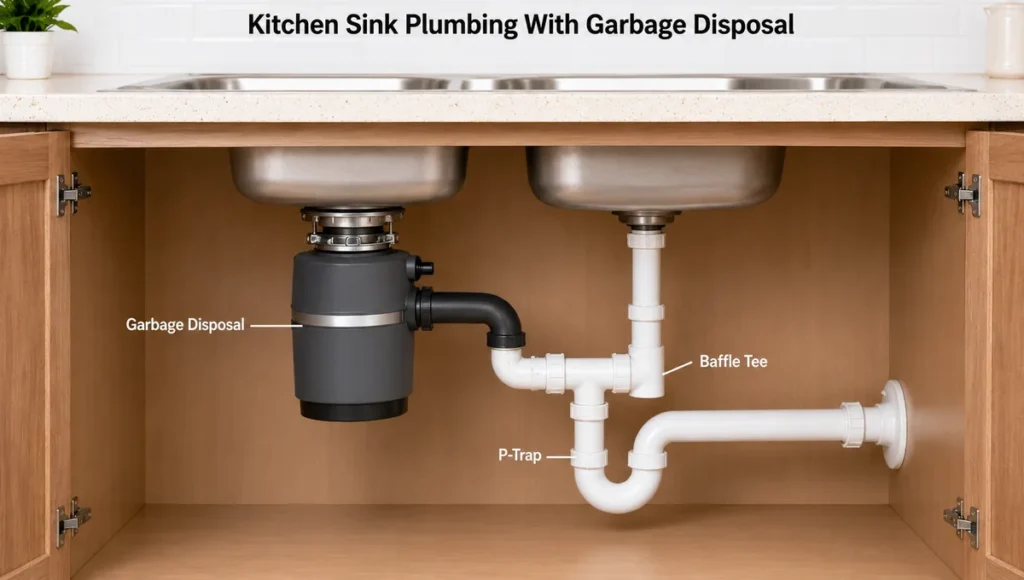
Adding a motorized appliance changes the rules of gravity and vibration. A kitchen sink plumbing diagram with garbage disposal shifts the entire plumbing assembly lower into the cabinet.
The disposal mounts directly to the sink flange. Instead of a standard tailpiece, a black plastic discharge tube (usually an elbow) bolts to the side of the disposal. In a single sink, this drops straight into the P-trap.
In a double sink, a kitchen sink disposal plumbing diagram requires a baffle tee. This is a special T-fitting with a curved interior wall. When the disposal blasts water horizontally into the tee, the baffle forces the water downward into the P-trap. This prevents ground-up food from shooting straight across and up into the second sink basin.
Always ensure the disposal’s discharge port sits slightly higher than the horizontal trap arm going into the wall. If the disposal sits lower than the wall pipe, water will pool inside the disposal housing, rusting the metal blades and causing severe odors.
Kitchen Sink Plumbing Diagram With Dishwasher
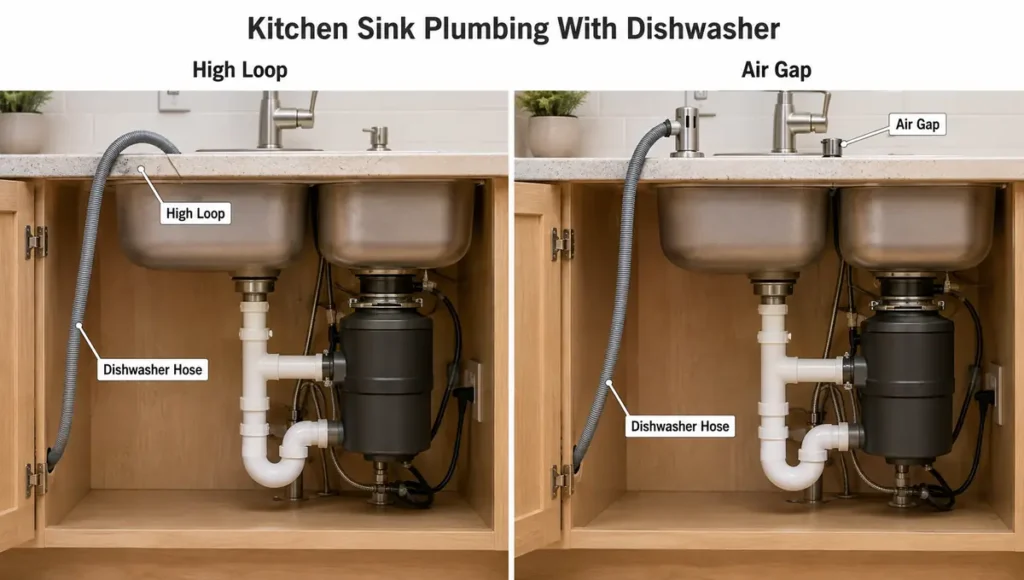
A kitchen sink plumbing diagram with dishwasher relies on one critical concept: preventing dirty sink water from flowing backward into your clean dishes.
In a single drain kitchen sink plumbing with dishwasher diagram, the dishwasher drain hose connects underneath the sink in one of two ways. It either clamps onto a barbed nipple on the side of the garbage disposal, or it clamps onto a specialized “dishwasher tailpiece” installed directly above the P-trap.
To prevent backflow, plumbing under kitchen sink diagram with dishwasher setups require one of two safety measures:
- The High Loop: The dishwasher hose is pulled all the way up to the underside of the countertop and secured with a strap before dropping back down to the drain connection. Gravity prevents sink water from climbing the high loop.
- The Air Gap: A small metal cylinder mounted on top of the sink deck. The hose runs up through the counter, into the air gap, and back down. While many homeowners hate how they look, an air gap is the only foolproof way to prevent backflow and is strictly required by local plumbing codes in places like California. Check your local requirements before drilling your countertop.
The most common DIY failure: If you connect the dishwasher to a new garbage disposal, you must knock out the plastic plug inside the disposal’s nipple with a screwdriver and a hammer. If you forget this step, the dishwasher cannot drain, and it will flood your kitchen floor on its first run.
Island Sinks and Venting: How to Use an AAV
Every plumbing layout must include venting. As water rushes down the drain, it creates a vacuum behind it. Without a vent to let air in, that vacuum will suck the water right out of your P-trap, leaving your home exposed to sewer gas.
In a normal kitchen, a vent pipe runs up the wall behind the sink and out through the roof. But what if your sink is in a kitchen island with no walls?
You need a kitchen sink plumbing vent diagram featuring an Air Admittance Valve (AAV). An AAV is a one-way mechanical valve that sits on a pipe high up inside the sink cabinet. When water drains, negative pressure opens the valve to let cabinet air in. When the water stops, a spring snaps the valve shut, keeping sewer gas sealed inside.
Code requires the AAV to be installed as high as possible under the counter—at least 4 inches above the horizontal trap arm—and it must remain accessible so you can replace it if the mechanical spring ever fails.
The “Deep Sink” Problem: When Your Wall Drain is Too High
Most guides skip this, and it is the thing that ruins the most remodels. Older homes were built for shallow, 6-inch drop-in sinks. Their wall drains were roughed-in relatively high, often 18 to 20 inches from the floor. Today, homeowners choosing a kitchen sink material often buy heavy fireclay or stainless undermount sinks that are 9 to 10 inches deep.
When you install a 10-inch deep sink and hang a heavy garbage disposal off the bottom of it, the disposal’s discharge port often ends up sitting lower than the drain pipe in the wall. You cannot force a kitchen sink plumbing diagram in wall to work if the geometry is wrong. Water cannot flow uphill. If your setup looks like this, you have a major problem. You cannot use a P-trap, and water will sit stagnant in the disposal.
What are your options?
- The hard way: You must open the drywall, cut out the existing sanitary tee, and glue in a new one a few inches lower on the vertical drain stack. This requires a permit and often a licensed plumber.
- The compromise: Buy a shallower sink, or remove the garbage disposal entirely to gain back a few inches of clearance.
Never try to force the pipes together with awkward angles or flexible hosing. If the discharge port is below the wall pipe, the rough-in must be changed.
Three Critical Plumbing Code Violations to Avoid
While comparing island dimensions and drainage systems across manufacturer spec sheets, one thing becomes clear: DIY plumbing fails when people try to invent their own pipe layouts. When figuring out how to install kitchen sink plumbing diagram setups, avoid these three illegal mistakes.
- Flexible Accordion Pipes: Hardware stores sell flexible, corrugated drain pipes that bend to fit any angle. Plumbers hate them, and plumbing codes ban them for drainage. The ridges trap food grease and bacteria, guaranteeing a severe clog and foul odors within months. Only use smooth, rigid PVC or ABS pipe. To keep the drain flowing cleanly, water needs a smooth runway.
- S-Traps: An S-trap drops water down, loops it up, and drops it straight down through the floor again. These are illegal in modern construction because the momentum of the falling water easily siphons the trap dry. If your old house has an S-trap coming up through the floor cabinet base, you should retrofit it with an AAV and a proper P-trap.
- Flat Trap Arms: A diagram might look flat on paper, but in reality, the pipe running from the trap to the wall must tilt slightly. If it runs perfectly level, or tilts backward toward the sink, grease will congeal and block the line.
Frequently Asked Questions
Why is my kitchen sink gurgling?
A gurgling sound usually means your sink is poorly vented. When water drains, a vacuum forms and pulls air through the water seal in the P-trap, creating a bubbling noise. This often means your roof vent is clogged with debris, or your under-cabinet Air Admittance Valve (AAV) has failed and needs replacement.
Can I install plumbing under a kitchen sink myself?
Yes, assembling a tubular PVC diagram of plumbing under kitchen sink components is generally safe and legal for a homeowner to do without a permit. However, if you need to alter the pipes inside the wall, move a vent stack, or lower the sanitary tee, most jurisdictions legally require a licensed plumber and a pulled permit.
Conclusion
Understanding your kitchen sink plumbing diagram takes the fear out of cabinet leaks and foul odors. Always start by identifying your rough-in height, mapping out your disposal connections, and ensuring your trap arm slopes properly. Verify your clearances, use rigid PVC instead of flexible shortcuts, and never ignore venting requirements. Your next step is to measure the height of your wall drain to ensure your new sink actually fits.




2 thoughts on “Kitchen Sink Plumbing Diagram: How It All Connects (With Visuals)”